
This screen is used for multiple tasks.
Specific tasks are listed below with their explanations.
Miscellaneous Shipments with Products
Miscellaneous Shipments without Product
FedEx Returns / UPS Returns - Call Tags
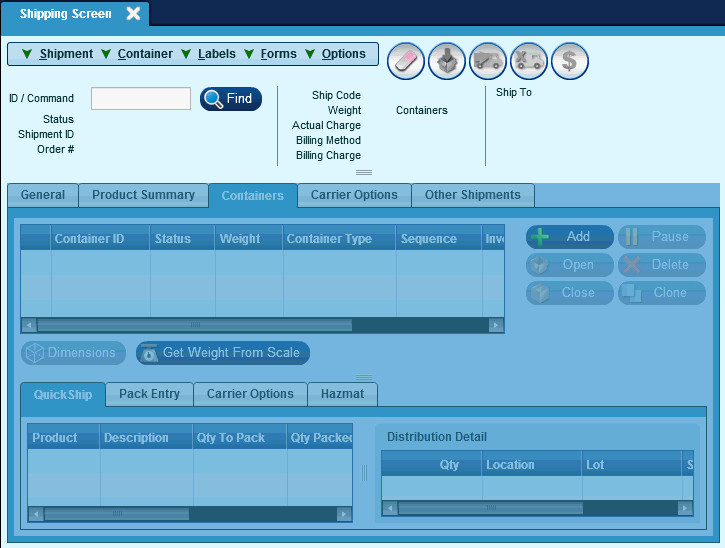


ID/Command:
This field is used to search for a Shipping ID. The ID can be entered in the field if known, or can be searched for by clicking the Find Button
If you have the specific Pack ID from the Epicor ERP you will enter one of the following depending on the type of shipment.
XXXX is the actual Pack ID number:
CSXXXX = Customer Shipment Pack
MPXXXX = Master Pack
MSXXXX = Miscellaneous Shipment Pack
SCXXXX = Subcontractor Shipment Pack
Status:
This field is used to display the status of the currently selected shipment.
Shipment ID:
This field is used to display the unique shipment ID for the currently selected shipment.
Order #:
This field is used to display the order number associated with the currently selected shipment.
Ship Code:
This field is used to display the ship code representing the carrier service associated with the currently selected shipment.
Weight:
This field is used to display the total weight of the currently selected shipment.
# / Containers:
This field is used to display the number of containers in the currently selected shipment.
Ship To:
This field is used to display the ship to address associated with the currently selected shipment.
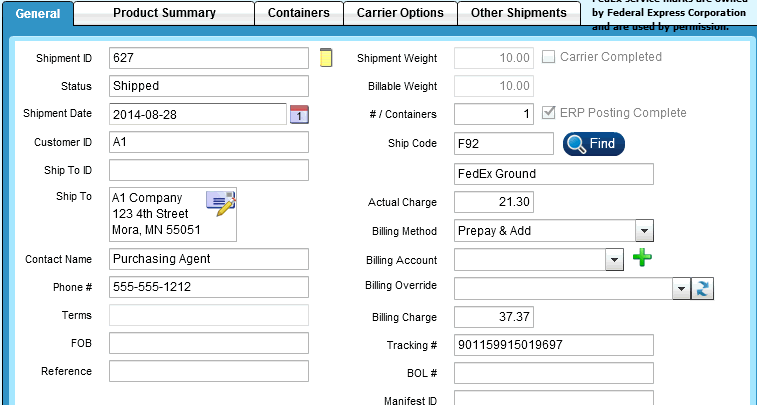
Shipment ID:
This field is used to identify the shipment ID number.
Status:
This read only field is used to display the status of the currently selected shipment.
Shipment Date:
This field is used to define the date of the shipment. This field automatically populates with the current date.
Customer ID:
This field is used to define the unique Customer ID of the customer associated with the shipment.
Ship To ID:
This field is used to define the unique Ship To ID of the ship to address associated with the shipment.
Ship To:
This field is used to define the ship to address associated with the currently selected shipment.
Contact Name:
This field is used to define the contact name of the person regarding the shipment.
Phone #:
This field is used to define the phone number for the contact.
Terms:
This field is used to define the Terms on the shipment.
FOB:
This is a user defined, informational only field to identify if the shipment is Free On Board; shipper pays to point of export, consignee pays balance. ORIG or DEST.
Reference:
This field is used to manually enter a reference number for the shipment.
Shipment Weight:
This field is used to define the total weight of the shipment.
Billable Weight:
This field is used to define the total weight of the shipment that was used for billing purposes.
# / Containers:
This field is used to define the total number of containers used in the shipment.
Ship Code:
This field is used to define the ship code for the currently selected shipment. The Find button may be used to search through available ship codes.
Actual Charge:
This field is used to define the actual shipping cost.
Billing Method:
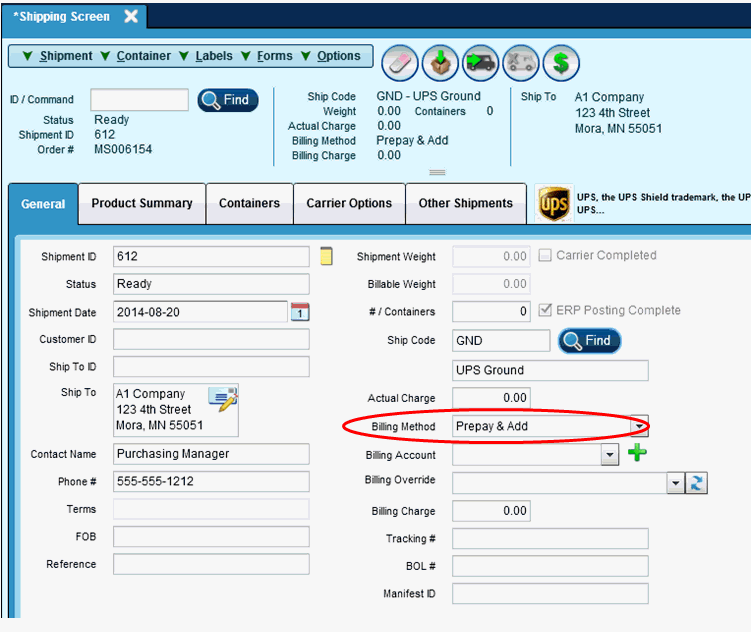
This drop down is used to select the freight billing method that should be used when this ship code has been selected by customer service to process the shipment.
Billing Account:
This drop down is used to select the account number to bill depending on the Billing Method selected.
Billing Override:
If Ship Code has an Alternate Billing Method and Over Ride Ship Code, it will appear here. See Ship Code Maintenance for more information.
Billing Charge:
This field is used to define the total billing amount charged to the customer.
Tracking #:
This field is used to define the tracking number for the currently selected shipment.
BOL #:
This field is used to define the unique Bill of Lading number associated with the selected shipment.
Manifest ID:
This field is used to define the Manifest ID that the shipment is associated with.

Order #:
This field is an incremental internal number used in Epicor Manifest.
Line:
This field is used to define the order line the product was shipped on.
Release:
This field not used in Epicor Manifest.
Product:
This field is used to display the unique product ID associated with the product.
Description:
This field is used to display the description of the product.
Warehouse:
This field not used in Epicor Manifest.
Qty Ordered:
This field is used to display the quantity of the product that was in this shipment.
Qty To Pack:
This field not used in Epicor Manifest.
Qty Allocated:
This field not used in Epicor Manifest.
Qty Packed:
This field not used in Epicor Manifest.
SNET:
This field not used in Epicor Manifest.
Ship Complete:
This field not used in Epicor Manifest.
Close:
This field not used in Epicor Manifest.
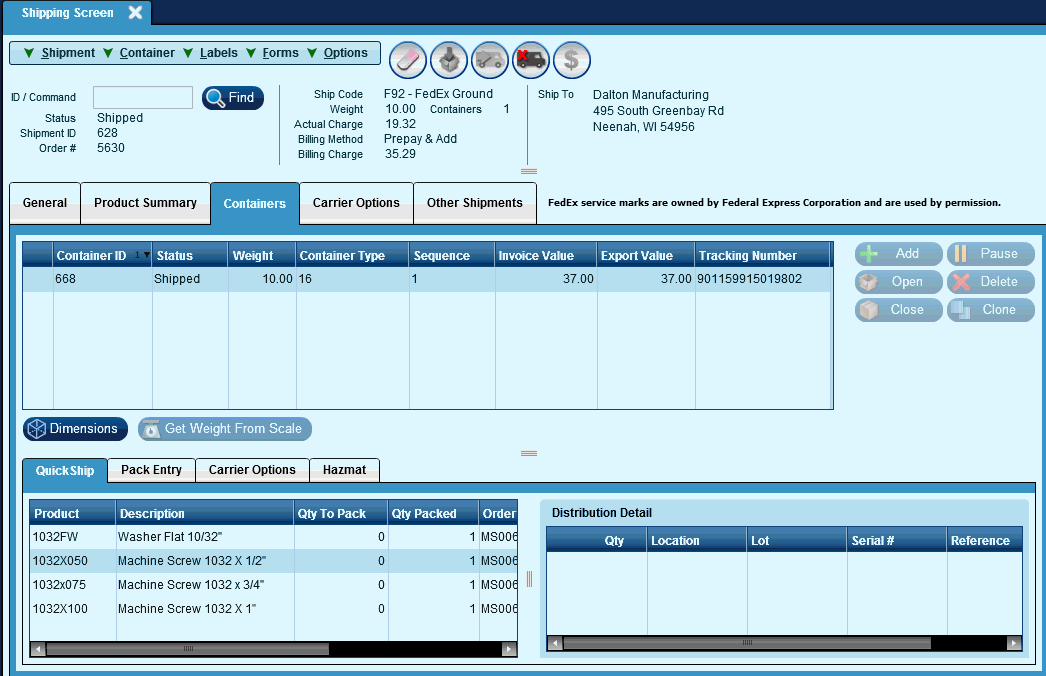
Container ID:
This field is used to display the unique container ID number for the container in the shipment.
Status:
This field is used to display the current status of the container in the shipment.
Weight:
This field is used to display the weight of the container in the shipment. This weight is usually the combined weight of the items in the container.
Container Type:
This field is used to display the type of container (e.g., Box, Tube, Parcel, etc.) being used in the shipment.
Sequence:
This Field is incremented internally for each container.
Invoice Value:
This field is used to display the Invoice value of the container. This is calculated by multiplying the quantity of products in the container with the unit price of the product.
Export Value:
This field is used to display the export value of the container. This is calculated by multiplying the quantity of products in the container with the export unit price of the product.
Tracking Number:
This field is used to display the tracking number associated with the container in the shipment. This field will display as blank until the shipment has been shipped/freighted.
ICONS:
Add:
This button is used to add a container to the shipment.
Open:
This button is used to open the currently selected container in the shipment.
Close:
This button is used to close the currently selected container in the shipment.
Pause:
This button is used to mark the container with the "Being Packed" status.
Delete:
This button is used to delete a container from the shipment.
Clone:
This button is used to make a copy of the currently selected container in the shipment.
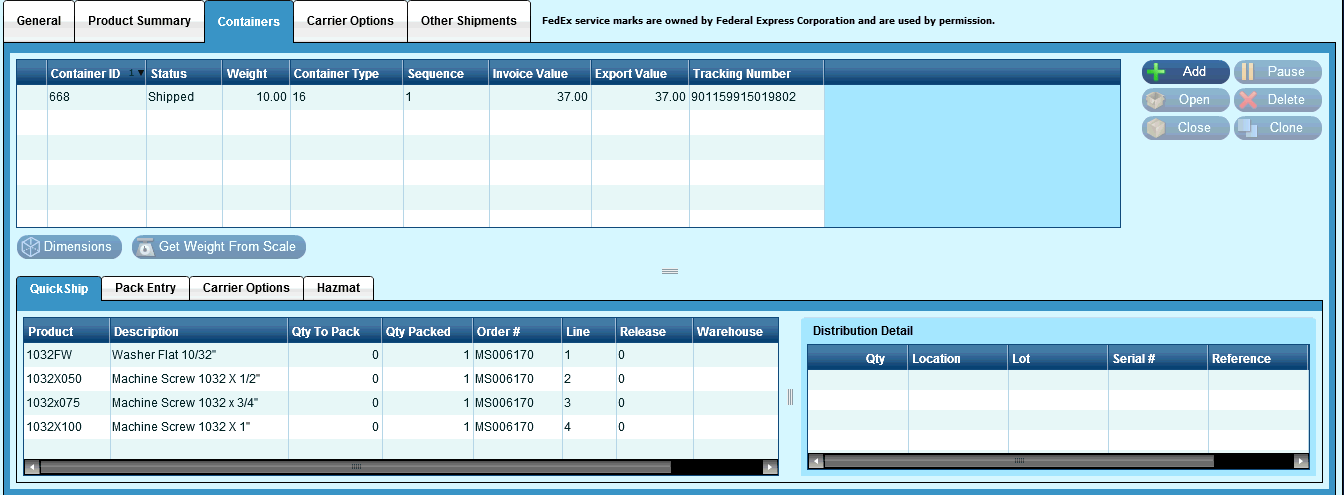
Product:
This field is used to show the unique product ID number for the product.
Description:
This field is used to display the description for the product.
Qty To Pack:
This field not used in Epicor Manifest.
Qty Packed:
This field is used to display the quantity of products that have already been packed into containers for the shipment.
Order #:
This field is an incremented internal number used in Epicor Manifest.
Line:
This field is used to display the item line number of the order for the associated product order.
Release:
This field not used in Epicor Manifest.
Warehouse:
This field not used in Epicor Manifest.
Distribution Detail Window:
Qty:
This field not used in Epicor Manifest.
Location:
This field not used in Epicor Manifest.
Lot:
This field not used in Epicor Manifest.
Serial #:
This field not used in Epicor Manifest.
Reference:
This field not used in Epicor Manifest.
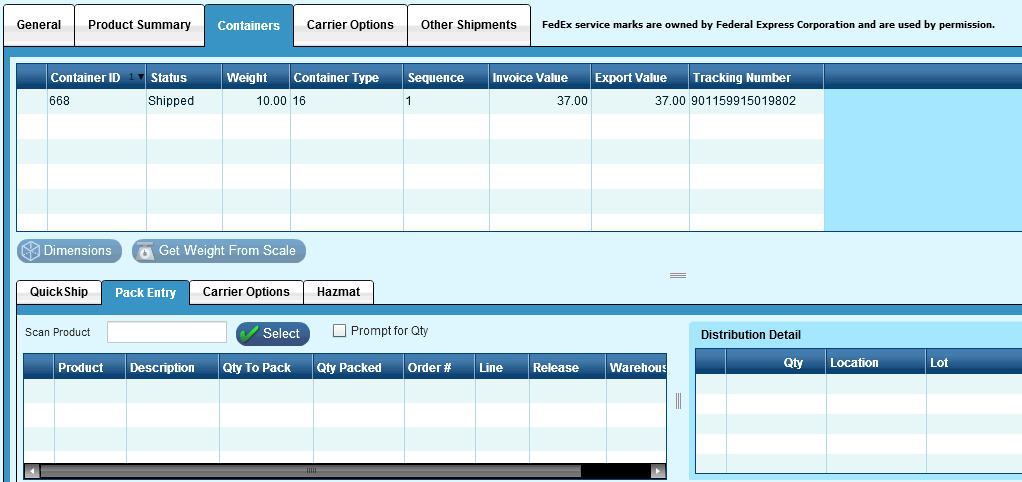
Containers Tab | Pack Entry Tab:
This tab is not used in Epicor Manifest.
Product:
This field not used in Epicor Manifest.
Description:
This field not used in Epicor Manifest.
Qty To Pack:
This field not used in Epicor Manifest.
Qty Packed:
This field not used in Epicor Manifest.
Order #:
This field not used in Epicor Manifest.
Line:
This field not used in Epicor Manifest.
Release:
This field not used in Epicor Manifest.
Warehouse:
This field not used in Epicor Manifest.
Distribution Detail Window:
Qty:
This field not used in Epicor Manifest.
Location:
This field not used in Epicor Manifest.
Lot:
This field not used in Epicor Manifest.
Serial #:
This field not used in Epicor Manifest.
Reference:
This field not used in Epicor Manifest.
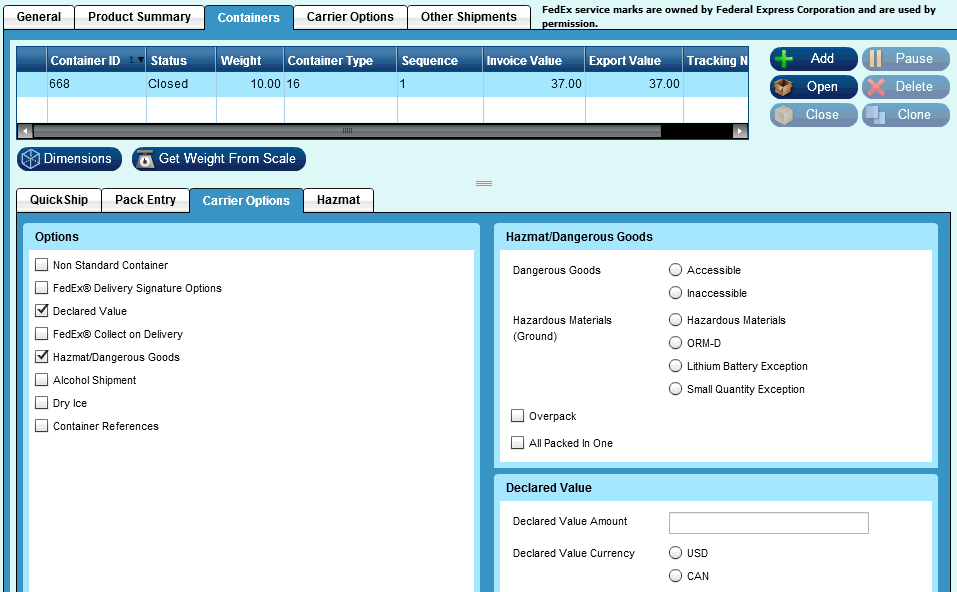
This tab is used to define options available on the shipment. The options on this tab will change depending on the carrier and service selected, as not all options are available for each carrier and service combination. If there are options that need to be defined further, a new pane will open on the right side of the screen with information and data fields needed.
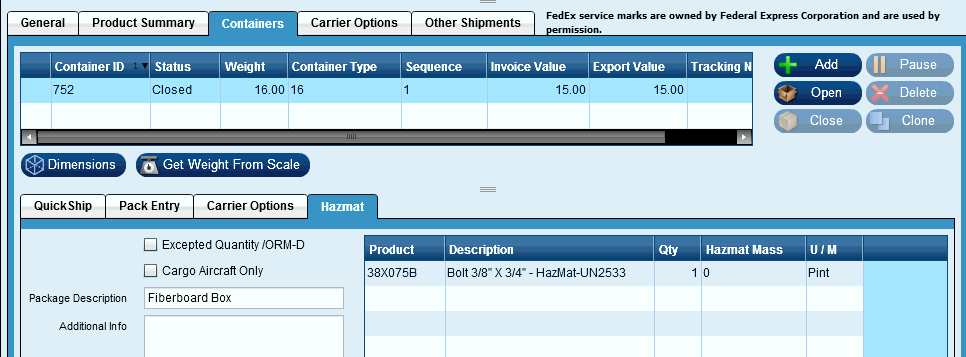
Excepted Quantity / ORM-D:
This flag is used to define if this hazardous material meets the definition of a 'consumer commodity' as defined in 49 CFR 172 and can be reclassified as 'Other Regulated Materials'. ORM-D materials are not subject to shipping paper requirements for hazardous materials unless being transported by air.
Cargo Aircraft Only:
This flag is used to define if this hazardous material can only be transported via cargo aircraft.
Package Description:
This field is used to define package instructions for hazardous material packaging.
Additional Info:
This field is used for additional information.
Product:
This field is used to display the unique Product ID for the Hazardous Material.
Description:
This field is used to display the description associated with the Hazardous Material.
Qty:
This field is used to display the quantity of the Hazardous Material product.
Hazmat Mass:
This field displays the products mass from the product file.
U/M:
This field is used to display the unit of measure associated with the Hazardous Material.
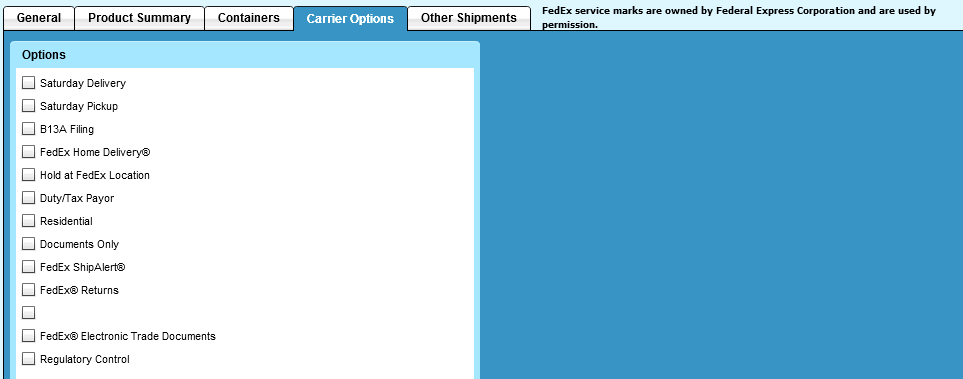
This tab is used to define options available on the shipment. The options on this tab will change depending on the carrier and service selected, as not all options are available for each carrier and service combination. If there are options that need to be defined further, a new pane will open on the right side of the screen with information and data fields needed.
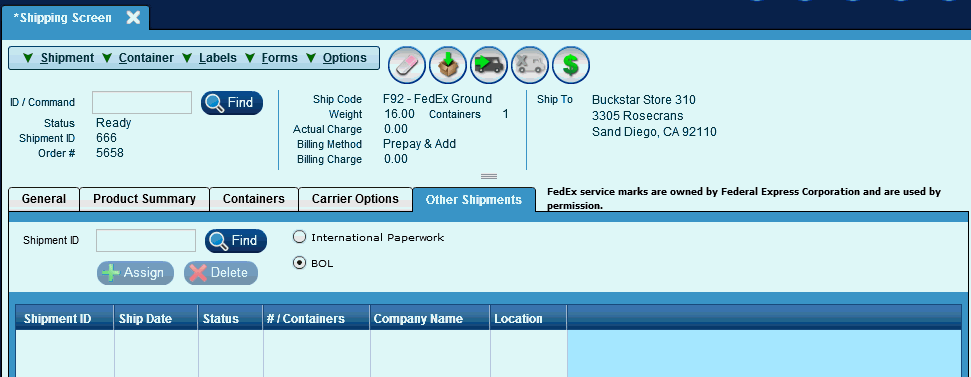
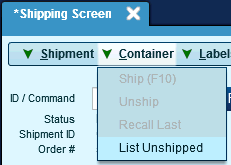
|
Options |
Description |
| Ship(F10) | This feature not use in Epicor Manifest. |
| Unship | This feature not use in Epicor Manifest. |
| Recall Last | This feature not use in Epicor Manifest. |
| List Unshipped | This feature not use in Epicor Manifest. |
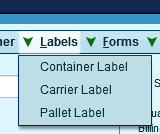
|
Label Type |
Description |
| Container Label | If a specific container is selected, this option will print a label with the contents of the container. |
| Carrier Label | If specific container selected,this option will reprint the carrier label. |
| Pallet Label | If a specific pallet/container is selected, this option will print a label with the contents of the pallet/container. |
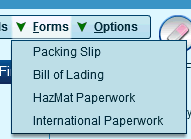
|
Form Type |
Description |
| Packing Slip | This option will reprint the packing slip for the shipment. |
| Bill of Lading | This option will take the user to the BOL screen. From there users can modify and print the BOL form. |
| HazMat Paperwork | This option will print HazMat paperwork for the selected container if the container selected is a hazmat container. |
| International Paperwork | This option will bring forward the current shipment’s international paperwork screen and allow for adjusting/printing international export documents. |
|
Option |
Description |
| Shipment Mode | This feature not use in Epicor Manifest. |
| Container Mode | This feature not use in Epicor Manifest. |
Address Information:
Miscellaneous shipments are used for shipping product exclusively through Epicor Manifest. These shipments DO NOT effect inventory.
After selecting 'Miscellaneous Shipment' from the pull down,

the following screen will appear:
From this screen you can select an existing address to ship to by clicking on the 'Find' button or ship to a new address by clicking on 'Use Address' button and entering a new address.

Using an existing customer:
If you know the CustomerID (Example: Dalton) you can enter it in the Customer field on the Miscellaneous Shipment screen and press enter or tab. Your customer’s information will be pulled into the screen as follows:

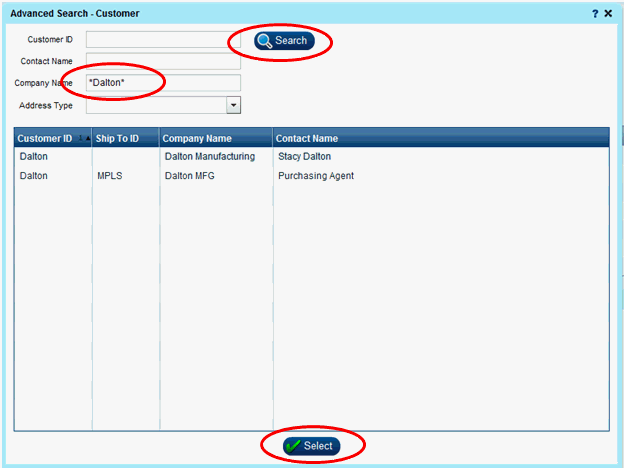
If you need to search for the customer or Ship To, click on the “Find” button next to the Customer field on the Miscellaneous Shipment Screen and the following 'Advanced Search - Customer' screen will appear.

Enter your customer search criteria and click “Search”. Your results will appear in the bottom grid. To select your Customer and pull the data into the Miscellaneous Shipment screen, either double click on the row in the grid or highlight the row and click the “Select” button at the bottom of the screen.
Adding a one-time address on the fly:
If you want to ship to an address but not add it as a customer, you can add the address into the Miscellaneous Shipment screen on the fly.
NOTE: This address is considered a 'One Time' address and will NOT be added to the Maintenance | Customer file. If the address you wish to send to will be used again, enter it in the Maintenance | Customer file.
Choose the radio button next to Use Address and the edit address icon will appear in the Address field.
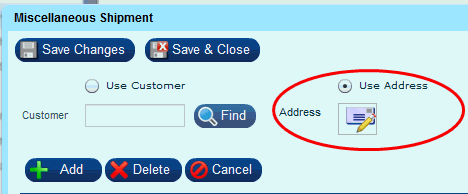
Click on the ![]() icon to display the Edit Address window.
icon to display the Edit Address window.
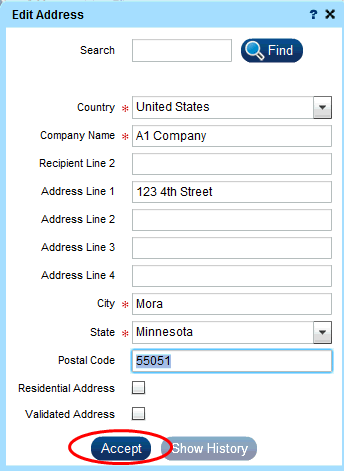
Input your one-time address information and click “Accept”.
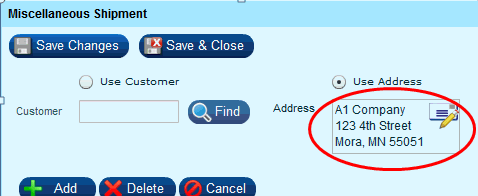
The address will now appear in the Miscellaneous Shipment Screen.
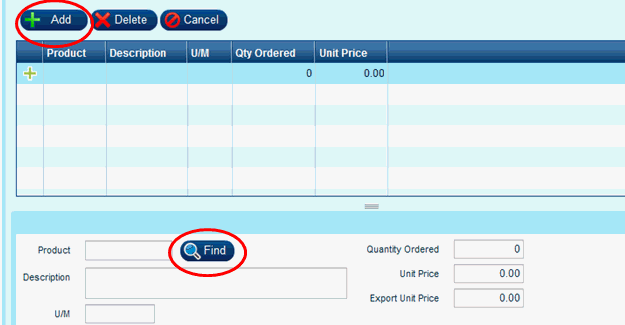
If you would like to add product to the shipment, click the “Add” button in the middle of the screen. A line will be added to the Product grid. You can enter the product information or search for the product by clicking on the “Find” button next to the Product field.
NOTE: You can create a Miscellaneous Shipment without adding any products.
Please see below for instructions on non-product shipments.
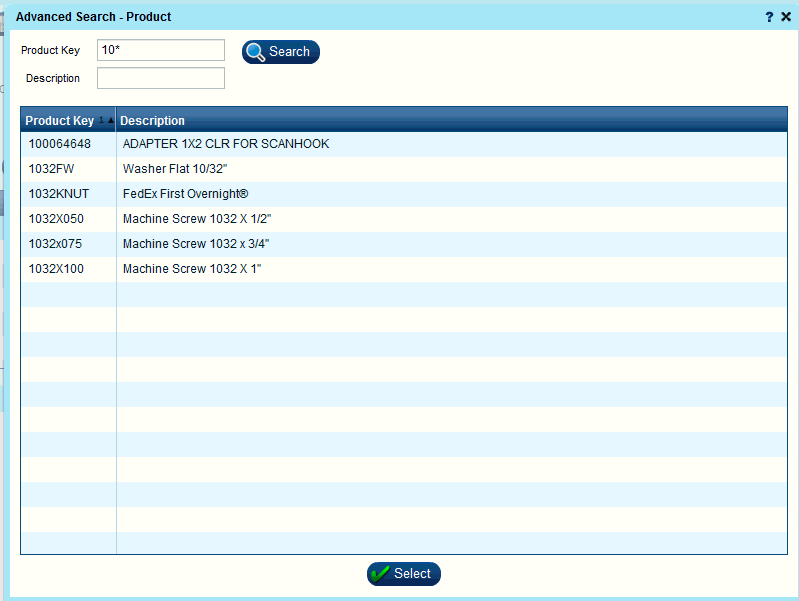
If you are searching for a Product and click “Find”, the following screen will appear:
Enter your search criteria and click “Search” or just click “Search to bring in all Products. Only 1000 records will appear at a time, so you may need to narrow your search criteria. To select your Product and pull the data into the Miscellaneous Shipment screen, either double click on the row in the grid or highlight the row and click the “Select” button at the bottom of the screen.
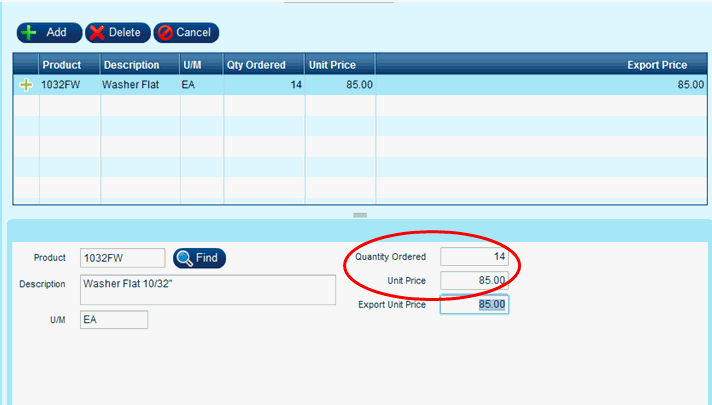
Enter your Quantity Ordered, Unit Price and Export Unit Price. If you need to add more products, repeat the Add Products Process.
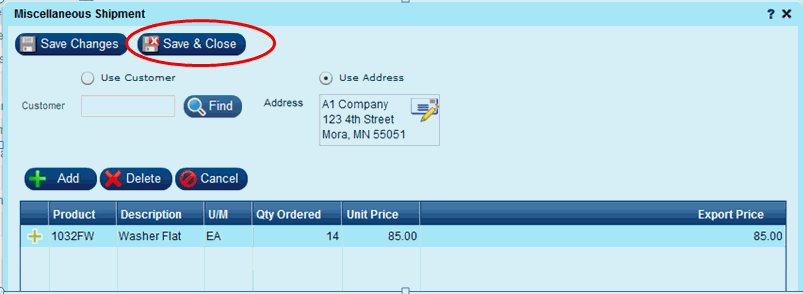
Click 'Save & Close' at the top of the screen to create the new Shipment record and return to the Shipping Screen.
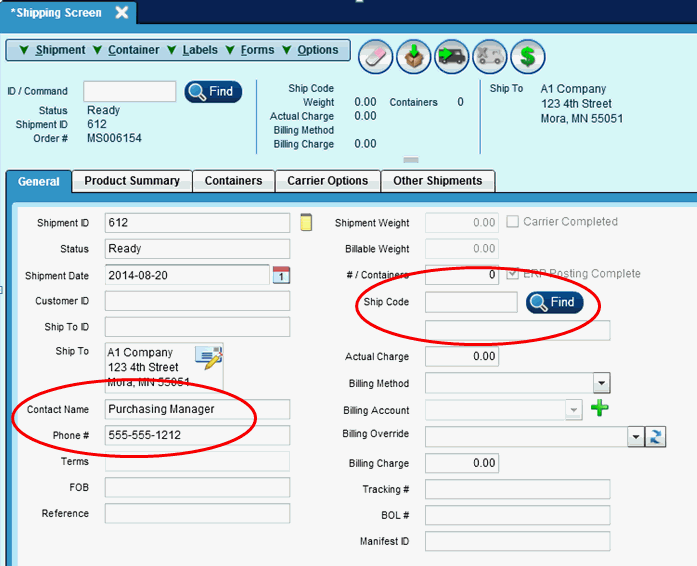
After clicking on Save & Close the following screen will appear:
If you have added the address on the fly, you will need to input a Contact Name and Phone #.
Input your Ship Code by entering the code and pressing enter or tab, or by using the “Find” button next to the Ship Code field.
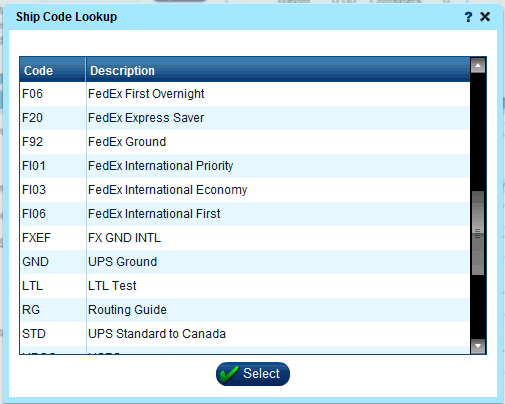
If you use the “Find” button to search for a ship code, the following screen will appear. To select your ship code and pull the data into the Shipping Screen, either double click on the row in the grid or highlight the row and click the “Select” button at the bottom of the screen.
If you need to change your Billing Method to Prepay, Recipient or Third Party and or add a Billing Account, select the Billing Method from the drop down list. It defaults to Prepay & Add unless the Ship Code or Customer has an alternate billing method assigned to it.
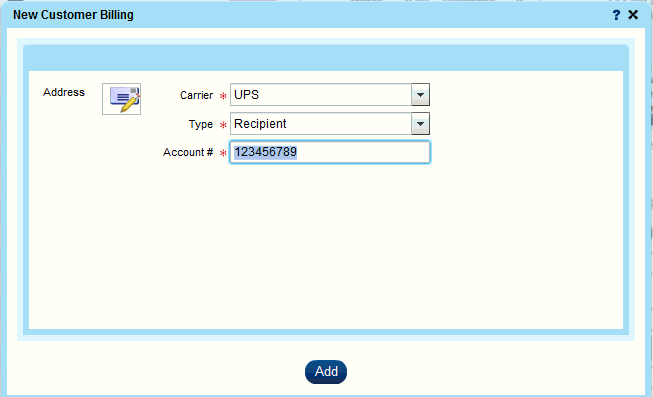
To add a Billing Account that is not already listed on the customer record, Click the plus sign next to the Billing Account field;

and the following screen will appear:
The next step is to create the container(s) that will be shipped.
From the Shipping Screen, move to the Containers tab.
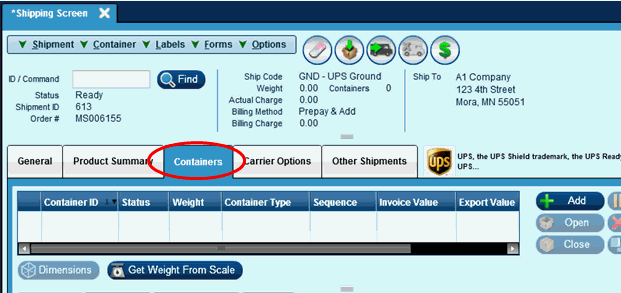
There are 2 options for adding containers.
OPTION 1:
If you have added product(s) to the previous screen and you only have ONE container, you can simply click on the 'Pack Remaining' button or F9 key at the top of the screen to have all products added to the container. If you have defined a 'Default Container' it will default in this step. if you wish to change the default container or enter a container if none is defined, you must 'Open' the container, make your changes and 'Close' it again.
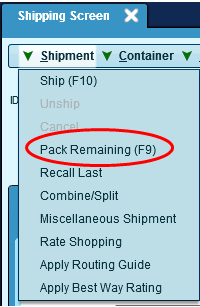
OR
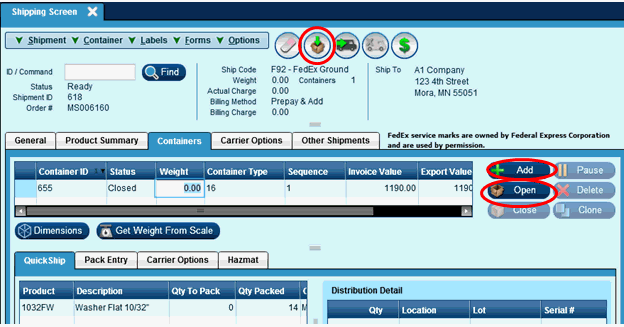
Either action will add the Product(s) to the carton.
You will then click in the 'Weight' field and enter the appropriate weight.
NOTE: You can only add a weight manually when the container is in a closed status.
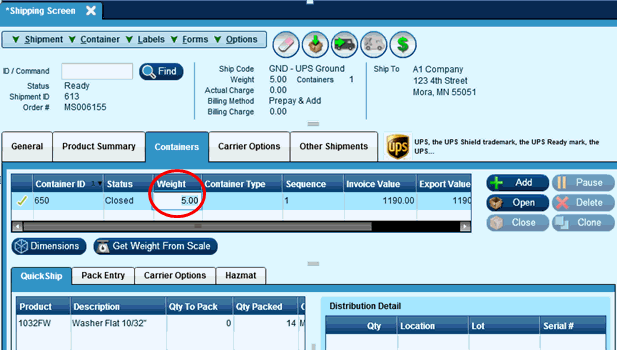
See section after Option 2 for remainder of process.
OPTION 2:
If you have added product(s) to the previous screen and have MULTIPLE containers, you will need to pack the product(s) in containers with the following steps:
From the Containers Tab click the “Add” button in the middle of the screen. A new line will be created in the containers grid. If you have set up a Default Container, it will default in. If you wish to change the Container Type, select from the drop down list.
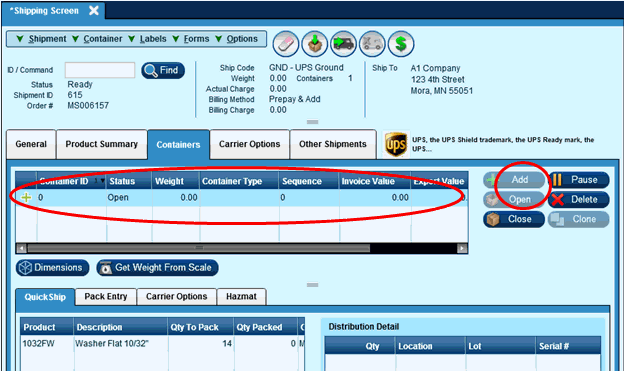
You will use the Pack Entry tab located at the bottom of the Containers tab to identify what product(s) are in each Container.
If "Prompt for Qty" is checked then you will be prompted for the quantity you want pack, otherwise it will default to packing a qty of 1 for the product selected.
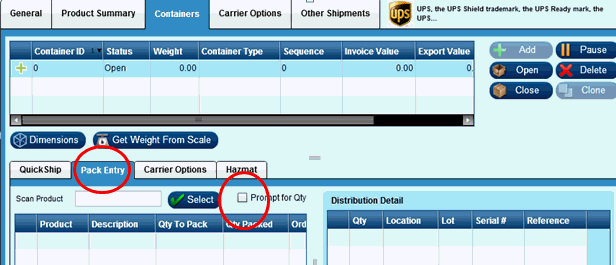
Enter the product id in the 'Scan Product' field or click “Select”.
When you click “Select” the following screen will appear displaying the shipment lines on the shipment. Double click on the line you wish to pack.

If you had Prompt for Qty checked, the following screen will appear for you to enter the Qty.

Input the qty to pack and click Enter or Add. The Product will be added to that container.
After completing the items in the specific container, click “Close” to close the container.
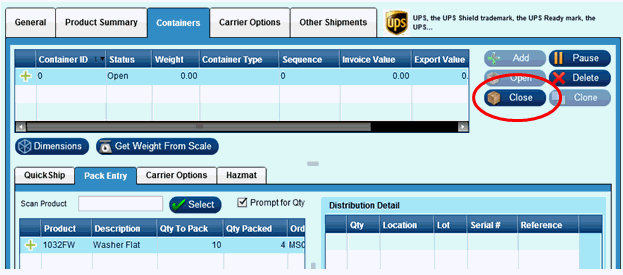
After container is closed, add a weight to the container line in the grid.
NOTE: You can only add a weight manually when the container is in a closed status.
Repeat these steps until all the product is packed in the desire number of containers.
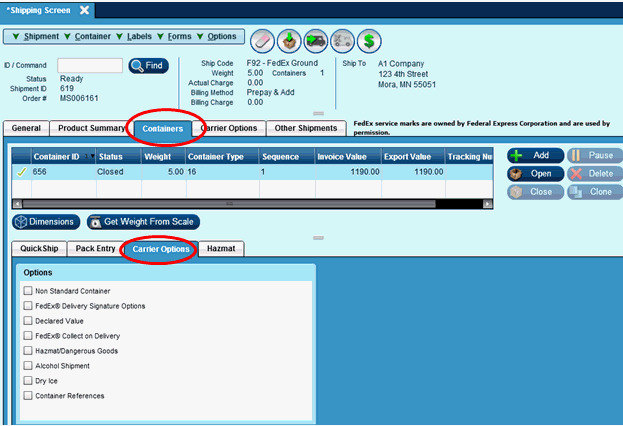
Once the desired number of containers are entered, add any Carrier Options needed. Carrier Options can apply to each container individually or to the entire shipment.
Container Carrier Options are located on the Carrier Options tab which is on the bottom of the Containers tab.
Choose the desired option and input the appropriate information on the right hand side if needed.
See Administration | Carriers for further discussion of Carrier Options.
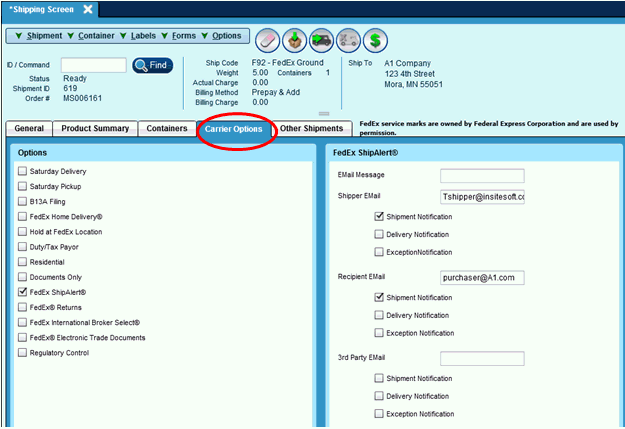
The Shipment Carrier Options are located on the Carrier Options tab located next to the Containers tab in the middle of the screen.
See Administration | Carriers for further discussion of Carrier Options.
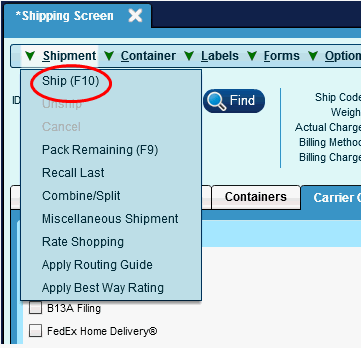
Once all of the Carrier Options are added, we are ready to Ship the Shipment. This can be completed by Clicking the Ship button at the top of the Shipping Screen.

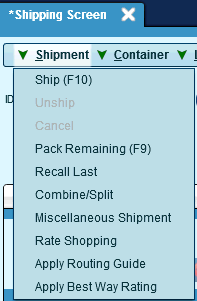
This function can also be completed in the Shipment menu by choosing “Ship” or by pressing F10 from the Shipping Screen.
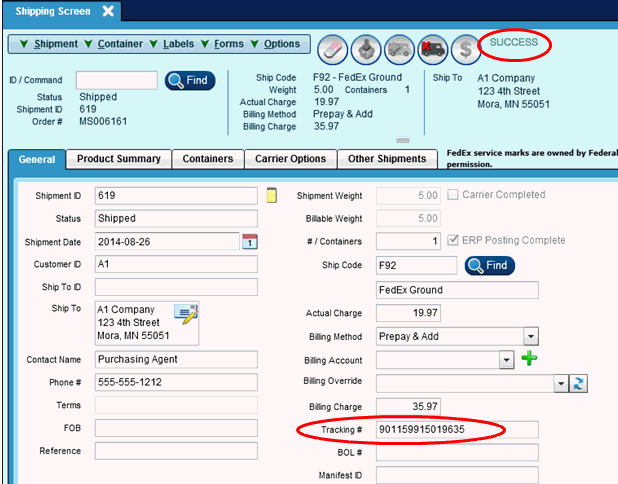
The shipment and container status will change to Shipped and you will see Success at the top of the screen, the Tracking number on the General tab and the label will be printed to the Carrier Label printer specified in your Workstation | Documents screen.
The shipment is now complete.
Address Information:
Miscellaneous shipments are used for shipping something exclusively through Insite with no product information entered.
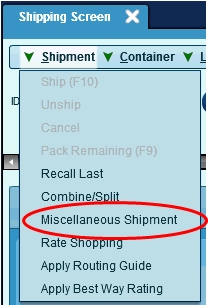
After selecting 'Miscellaneous Shipment' from the pull down, the following screen will appear:
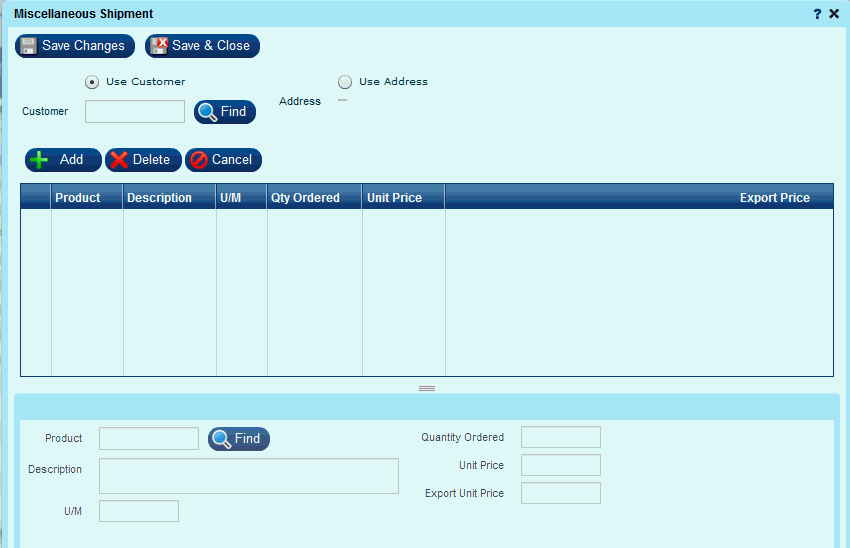
From this screen you can select an existing address to ship to by clicking on the 'Find' button or ship to a new address by clicking on 'Use Address' button and entering a new address.
Using an existing customer:
If you know the CustomerID (Example: Dalton) you can enter it in the Customer field on the Miscellaneous Shipment screen and press enter or tab. Your customer’s information will be pulled into the screen as follows:

If you need to search for the customer or Ship To, click on the “Find” button next to the Customer field on the Miscellaneous Shipment Screen and the following 'Advanced Search - Customer' screen will appear.

Enter your customer search criteria and click “Search”. Your results will appear in the bottom grid. To select your Customer and pull the data into the Miscellaneous Shipment screen, either double click on the row in the grid or highlight the row and click the “Select” button at the bottom of the screen.

Adding a one-time address on the fly:
If you want to ship to an address but not add it as a customer, you can add the address into the Miscellaneous Shipment screen on the fly.
NOTE: This address is considered a 'One Time' address and will NOT be added to the Maintenance | Customer file. If the address you wish to send to will be used again, enter it in the Maintenance | Customer file.
Choose the radio button next to Use Address and the edit address icon will appear in the Address field.

Click on the ![]() icon to display the Edit Address window.
icon to display the Edit Address window.
Input your one-time address information and click “Accept”.

The address will now appear in the Miscellaneous Shipment Screen.

Click 'Save & Close' at the top of the screen to create the new Shipment record and return to the Shipping Screen.
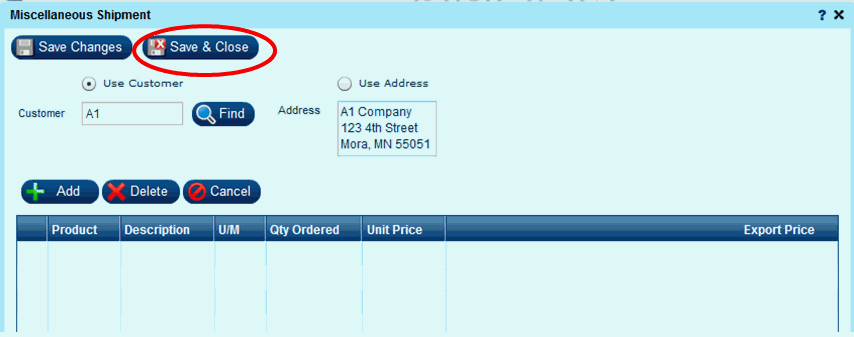
If you have added the address on the fly, you will need to input a Contact Name and Phone #.
Input your Ship Code by entering the code and pressing enter or tab, or by using the “Find” button next to the Ship Code field.

If you use the “Find” button to search for a ship code, the following screen will appear. To select your ship code and pull the data into the Shipping Screen, either double click on the row in the grid or highlight the row and click the “Select” button at the bottom of the screen.

If you need to change your Billing Method to Prepay, Recipient or Third Party and or add a Billing Account, select the Billing Method from the drop down list. It defaults to Prepay & Add unless the Ship Code or Customer has an alternate billing method assigned to it.

To add a Billing Account that is not already listed on the customer record, Click the plus sign next to the Billing Account field;

and the following screen will appear:

The next step is to create the container(s) that will be shipped.
From the Shipping Screen, move to the Containers tab.

Click on the 'Add' button. This will create a new carton. If you have defined a 'Default Container' it will default in this step. if you wish to change the default container or enter a container if none is defined select the container type from the drop down.
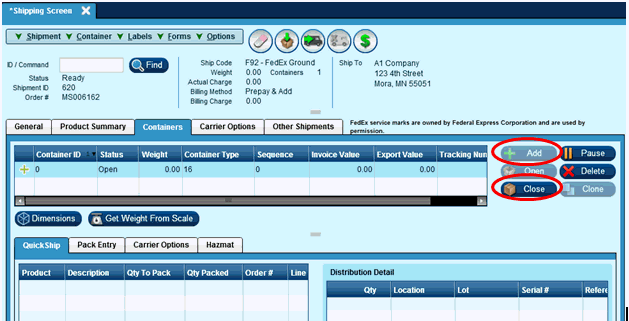
Upon selecting the 'Close' button you will receive the following warning:
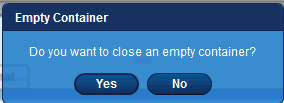
Select Yes to complete the container selection process.
After completing any Container Type information, click on the 'Close' button.
You will then click in the 'Weight' field and enter the appropriate weight.
NOTE: You can only add a weight manually when the container is in a closed status.
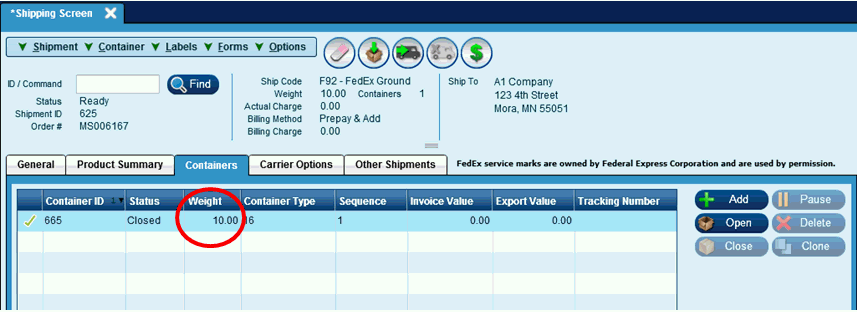
Repeat these steps until you have entered the desire number of containers.
Once the desired number of containers are entered, add any Carrier Options needed. Carrier Options can apply to each container individually or to the entire shipment.
Container Carrier Options are located on the Carrier Options tab which is on the bottom of the Containers tab.
Choose the desired option and input the appropriate information on the right hand side if needed.
See Administration | Carriers for further discussion of Carrier Options.

The Shipment Carrier Options are located on the Carrier Options tab located next to the Containers tab in the middle of the screen.
See Administration | Carriers for further discussion of Carrier Options.

Once all of the Carrier Options are added, we are ready to Ship the Shipment. This can be completed by Clicking the Ship button at the top of the Shipping Screen.

This function can also be completed in the Shipment menu by choosing “Ship” or by pressing F10 from the Shipping Screen.

The shipment and container status will change to Shipped and you will see Success at the top of the screen, the Tracking number on the General tab and the label will be printed to the Carrier Label printer specified in your Workstation | Documents screen.
The shipment is now complete.

Process shipment as for Product or Non-Product thru the container steps.
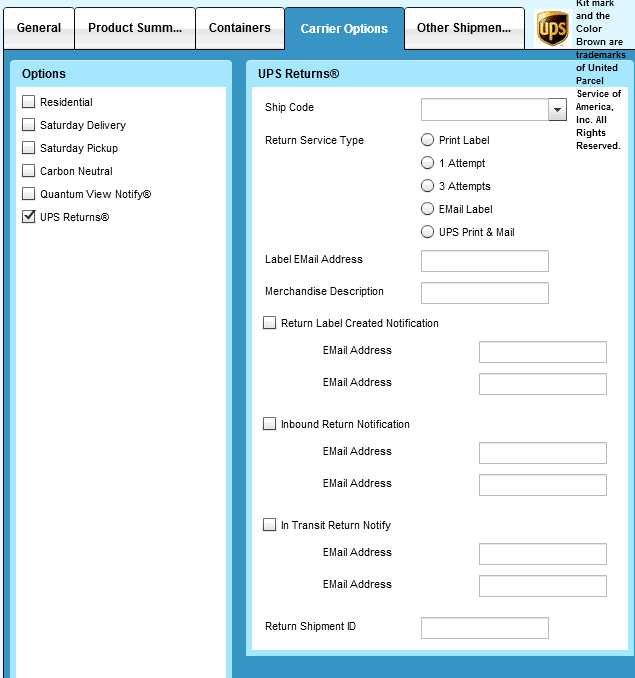
After completion of container creation/entry, use the Carrier Option tab to select FedEx Returns OR UPS Returns.
By choosing FedEx Returns or UPS Returns, our application automatically switches the Shipper and Recipient information in the shipment request and on the label. Your facility address will be the recipient and the customer will be the shipper.
See below for examples of the information needed for each carrier's return.
After entering appropriate return information, process as for other shipments.
If you chose the "EMail Label" option, an EMail will be sent to the Customer’s EMail address that you entered with a link to that label.
If you chose the "Print Label" option, the label will print to the Carrier Label printer specified in your Workstation | Documents screen.
NOTE: International Returns REQUIRE a part number for the shipment.
FedEx Returns:

UPS Returns:
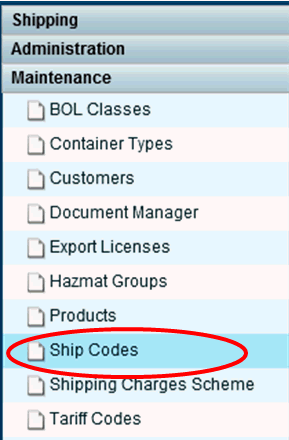
The first step in rate shopping is making sure that your ship codes are properly setup to be included in the rate shopping process.
Once the ship codes are initially setup to be included in Rate Shopping, this step is no longer needed.
Navigate to the Ship Codes screen on the Maintenance menu and double click to open the screen
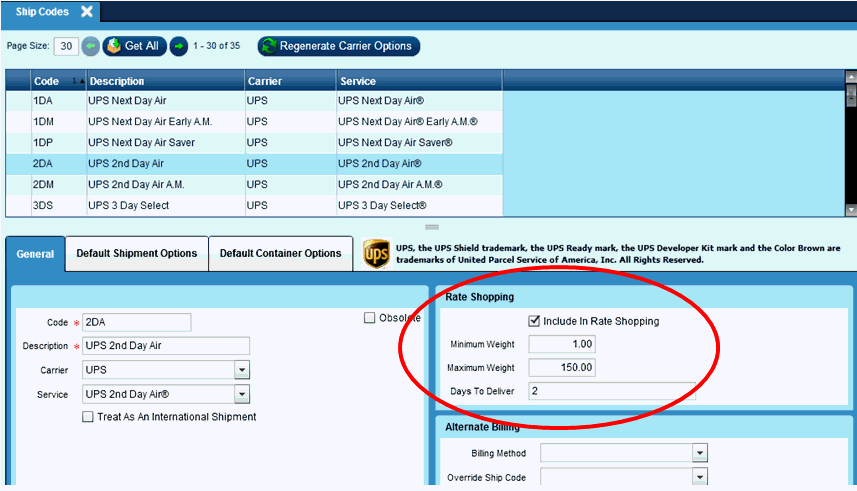
In the grid, highlight the ship code that you would like to include in rate shopping and check the “Include In Rate Shopping" check box. Assign the weight range by entering a minimum and maximum weight. If the rate shopping shipment’s weight is within that range, this ship code will be included in the rates returned.
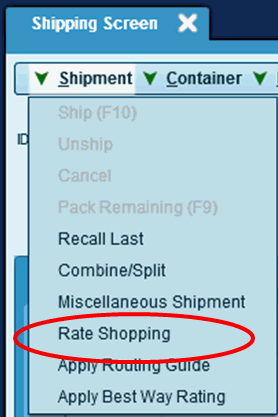
After selecting 'Rate Shopping' from the pull down,
the following screen will appear:
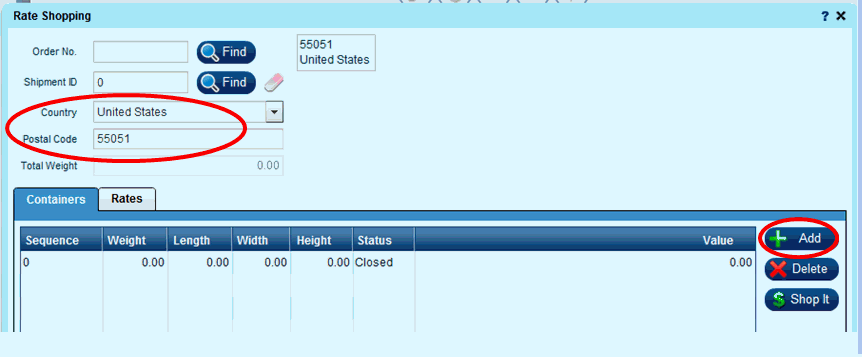
Select the country from the drop down box and enter the zip code. Click the 'Add' button to open the Containers section.
Click into the Weight field and enter the weight you are trying to Rate Shop for. If the dimensions are revellent (over sized, etc) enter any dimension information.
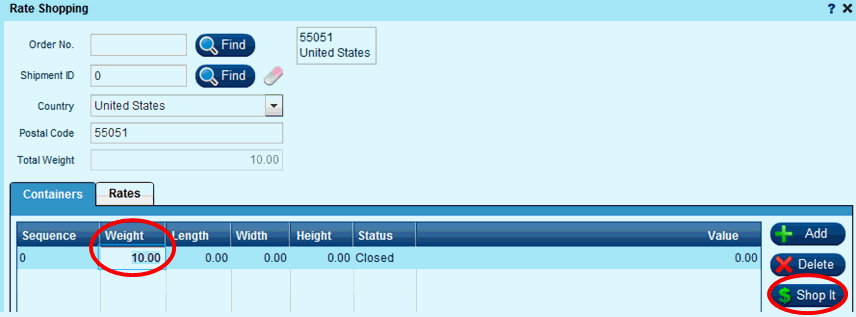
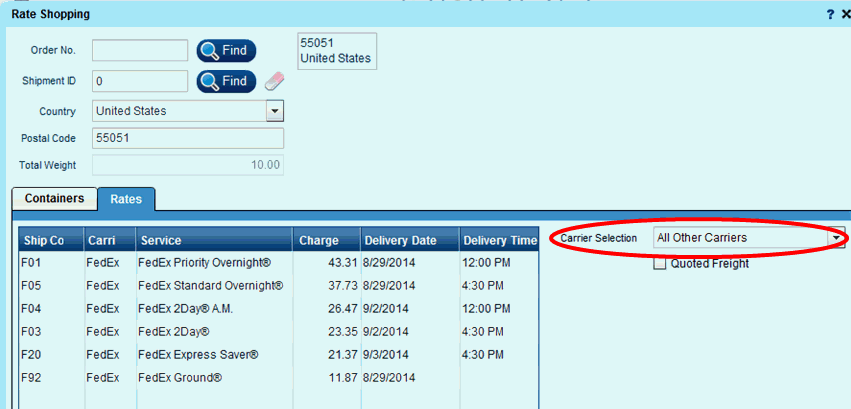
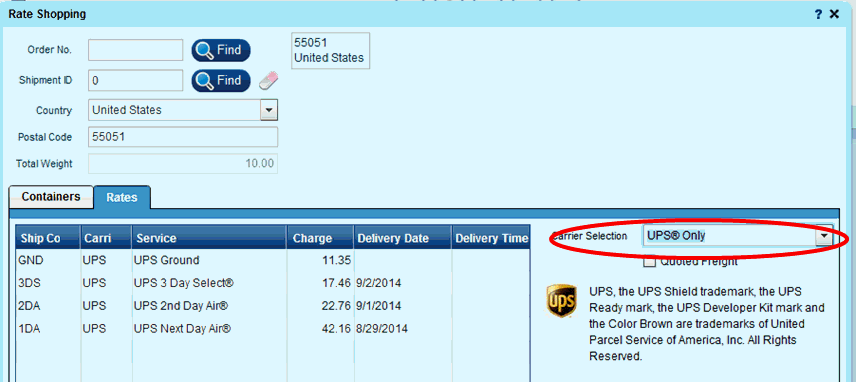
After clicking the 'Shop It' button, you will proceed to the Rates tab. Depending on the Ship Codes selected in the first step, rating information will be displayed. Note that the Carrier Selection optionally displays and UPS information as UPS does not allow their rates to be displayed on the same screen as other carriers.
To view UPS rates use the 'Carrier Selection' pull down to select 'UPS Only'.
