

Epicor Manifest Edition is a shipping system that is integrated with the Epicor ERP System as a complete shipping solution.
There are files that need to be set up in each system. Some of these files are linked and some are independent.
Most (90%) of the daily processes will be done in the Epicor ERP.
Processes that will be handled in Epicor Manifest optionally include Creating International Paperwork, Creating Miscellaneous (non-inventory) shipments and generating a Bill of Lading.
During Installation a new Epicor Manifest a database was created and your company record was added to that database along with a number or other files that are required for initial setup.
Below are the steps that MUST be reviewed for an initial implementation. Some of the information was entered when your system was setup, you are responsible for verifying that information and adding any additional information that is appropriate.
The below information relates to the Basics Class i.e. not LTL or International specific information. See those specific topics for information related to them.
Data SetUp/Basics Class Outline:
Review/Discuss Current Shipping Modules and Procedures
Review Help Files:
Manifest File SetUps:
3 - Administration - Facilities
4 - Administration - Workstations
Verify Weight Source = Manual
Customer OR Daily Rates
7 - Administration - Application Settings
Add FedEx | VariableHandlingChargeType = NET_FREIGHT
Add FedEx | VariableHandlingChargeValue = 0.00
8 - Maintenance - Document Manager
Manifest Summary
Manifest Detail
10 - Maintenance - Container Type
Epicor ERP File SetUps and Processing:
File Set Ups:
Processing:
Tracking Details / Phantom Packs
Single Order / Multiple_Package
Multiple Order / Single Container
Epicor Manifest Application Misc Shipments
Manifest Detail Report Example
Manifest Summary Report Example
It is recommended you complete implementation in the following steps. Please note the fields denoted with a Red asterisk are required, but ALL fields that you have information for should be filled out.
Review the Welcome topic to familiarize yourself with screen layouts and navigation.
The login screen will be the first screen displayed when Epicor Manifest is launched. This is where the user credentials will be input to enter into the application.
Review the Logging In topic to familiarize yourself with the Logging In procedure.
This is an outline of the information covered in the Basics Class. See above for class outline.
This is an outline of the information covered in the LTL Class.
This is an outline of the information covered in the International Class.
This is a list of various Error messages.
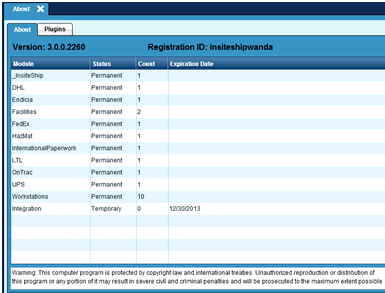
Installed Epicor Manifest Modules
This option displays modules in the license and the number of workstations.
See Help File information for additional file information.
Note the fields denoted with a red asterisk are required, but ALL fields that you have information for should be filled out.
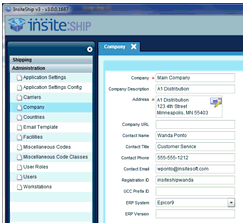
The Company screen is used to set up the user's company information. This screen is used for global parameters and should include the company's headquarters information.
This Company information is used for the UPS registration information. The actual UPS account numbers, etc are gotten from the Facilities record.
See Help File information for additional file information.
Note the fields denoted with a red asterisk are required, but ALL fields that you have information for should be filled out.
This module is used to define and manage Facilities.
At least one facility would have been added during installation. Add any additional facilities. Facility is ‘Carrier Account’ number driven.

NOTE REGARDING REFERENCE FIELDS:
Epicor Manifest Edition:
ONLY allows Ref1, Ref2 and Ref3 for FedEx.
ONLY allows Ref1 and Ref2 for UPS.
Epicor Manifest Edition recommends using:
Reference 1 : Customer PO Number
Reference 2 : Order Number
Reference 3 : ShipmentID
Warehouses, Picking Queues and Calendar tabs are NOT currently used in Epicor Manifest.
See Help File information for additional file information.
Note the fields denoted with a red asterisk are required, but ALL fields that you have information for should be filled out.
The Workstations file is designed to setup workstations and configure the associated printer and options. While a facility is a physical location from where orders are shipped, the workstation is an area within that facility where the shipper will conduct his or her work. At least one workstation is required and should have been setup during installation.
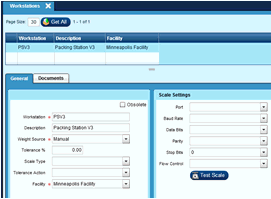
Weight Source:

- Calculated
- Manual
- Scale
- Calculated/Scale
Epicor ERP customers MUST use the Manual option for Weight Source. The weight of the container is retrieved from the Epicor ERP.
See Maintenance | Document Manager Section for additional information.
The Documents tab on the Workstations screen is where you can setup individual printers and the # of copies to print for each workstation. If the user only has one workstation, only Carrier Labels and Carrier Forms need to be setup, other document types do not need to be setup here unless they have a need for a separate printer distinction.

Currently recommending to ONLY use 0 or 1 for number of copies.
Use System Custom Properties to set appropriate file types for the label printers.

See Help File information for additional file information.
Note the fields denoted with a red asterisk are required, but ALL fields that you have information for should be filled out.
This file identifies the Users in Epicor Manifest.
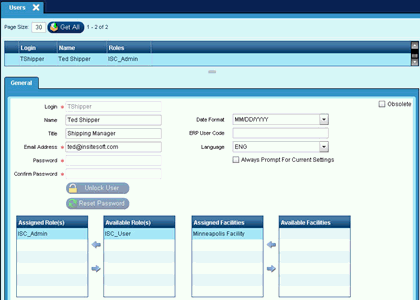
Epicor Manifest recommends checking 'Always Prompt for Current Settings'.
When adding a new user, you MUST SAVE the record before assigning Roles and Facilities.
Unlock User:
A user login will be locked if they have unsuccessfully attempted to login with the incorrect credentials 3 times. Use this button to unlock and allow them to retry.
Reset Password:
Use this button to Reset a users password. This icon CANNOT be used for resetting your OWN password.
If an individual user wishes to change their password; double click on the lower left Welcome button, a window will popup and the user can change their password.
See Help File information for additional file information.
Note the fields denoted with a red asterisk are required, but ALL fields that you have information for should be filled out.
The Carrier file is used to define the carriers at a global level. Default and Global Information are maintained at this level.
This option should be used very carefully. It is the methodology that allows Epicor Manifest to add options used in the Maintenance | Ship Codes windows for mapping.
Information for LTL carriers is covered in the LTL Class.
If you are licensed for a specific carrier and it is NOT listed, contact your Epicor Manifest consultant to review your license options.
The information displayed has been setup by the technician when the test environment was installed. No changes should be made.

Default Rate Basis:
This field is used to define the Default Rate Basis for the carrier.
FedEx:
Customer = The Customers Negotiated Rate.
List = The published rates for the carrier.
UPS:
Customer = The Customers Negotiated Rate.
List = The published rates for the carrier.
USPS:
Customer = The Customers Negotiated Rate is the ONLY rate available to USPS.
See Help File information for additional file information.
Note the fields denoted with a red asterisk are required, but ALL fields that you have information for should be filled out.
The Application Setting file is used to set additional parameters to the system that are not already expressed in the facility or company. These settings are either assigned to a specific facility or default to a global setting for the entire company. NOTE: If you have multiple facilities you MUST either leave the Facility blank OR add a record for EACH Facility.
Add the following 2 application settings:
FedEx - VariableHandlingChargeType = NET_FREIGHT
FedEx - VariableHandlingChargeValue = 0

See Help File information for additional file information.
Note the fields denoted with a red asterisk are required, but ALL fields that you have information for should be filled out.
The Document Manager file is the report hub for the Bill of Laking, International Paperwork, and non-carrier specific Manifest reports.
Suggested Set Up:
Manifest Detail
Manifest Summary
Hierarchy for Reports printing:
Document Manager
Carriers | Documents
Workstations | Documents
Customers | Documents
The report templates are typically located in the folder C:Reports on the server where Print Monitor is installed.
It is recommended that the Document Manager setups are done on the Print Monitor Server.
See Help File information for additional file information.
Note the fields denoted with a red asterisk are required, but ALL fields that you have information for should be filled out.
The Ship Codes file is used to map ship codes from the Epicor ERP to the proper carrier/service in Epicor Manifest.
Ship Codes MUST be set up in both Epicor ERP and Epicor Manifest.
You can enter the ShipCodes manually or if Integration has been setup, you can sellect the 'Refresh Ship Codes' from the upper right hand icon to import codes from Epicor.
You sill still need to map the codes; ONLY the Code and Description fields will be populated.
Domestic Parcel Ship Codes do not require Options set up.
LTL and International Ship Code mapping will be discussed in their respective classes.
See Help File information for additional file information.
Note the fields denoted with a red asterisk are required, but ALL fields that you have information for should be filled out.
The Container Type file is used to define and manage containers associated with a specific container type to define various characteristics.
Container Types MUST be setup in both the Epicor ERP and Epicor Manifest.
For multiple Facilities, user must logon with credentials for EACH facility and add the appropriate Container Types for that Facility.
Change Options | Preference to reflect actual workstation in Epicor.


Material Management | Shipping/Receiving | Setup | Workstation:

Station ID MUST match the Workstation Name in Epicor Manifest Edition.
Select appropriate Weight Input:
'Prompt for Weight' - User will manually enter weight.
'Get Weight from Part configuration' - Weight will be calculated from part file.
'Get Weight from Scale' - A scale is attached and each package will be weighed.
Recommended Scales: Mettler/PS60 or Toledo.
A USB scale will not communicate to Epicor Manifest. Epicor Manifest requires a SERIAL connection in order to communicate with the scale.
Check the Enabled box.
Web Service URL:
Below is an example of an entry.
http://[IP ADDRESS where Web Server is Installed]/EpicorFreightService/EpicorFreightService.svc
Manifest/Weight Capture Point:
'Pack' for Customer Shipment Entry Orders or 'MasterPack' for Master Pack Orders.
MasterPack Functionallity is covered in the LTL Class.
Weight UOM:
LB for US accounts.
Size UOM:
IN for US accounts.
Sales Management | Order Management | Setup | Miscellaneous Charge:
To have the Freight Dollars returned to Epicor; the following must be set up:
Verify that a Freight Charge is Configured with ‘Shipping Access’ box checked.
This code is tied to a GL Account number. Normal shipping will write to this code.

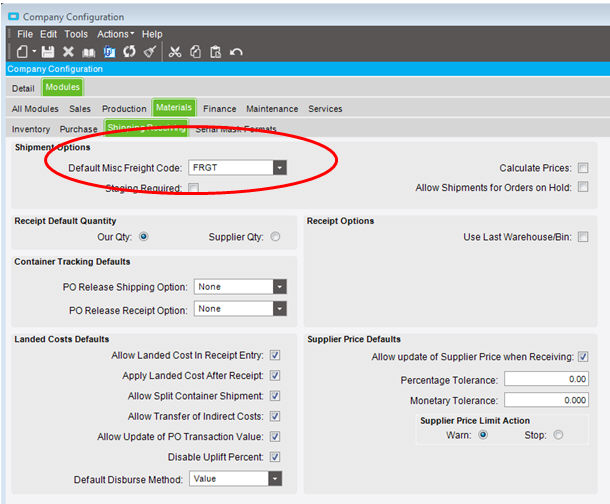
System SetUp | Company/Site Maintenance | Company Configuration:
Modules Tab |Materials|Shipping Receiving Tab
Verify ‘Default Misc Freight Code’ is populated with the desired Freight Charge Code.
NOTE: Subcontractor Shipment Entry and Transfer Order Shipment is very similar to Customer Shipment Entry. We will NOT be covering those procedures.
95% of the time we will be in Epicor. Epicor Manifest Edition is working behind the scene.
Material Management | Shipping & Receiving | General Operation | Customer Shipment Entry.
Encourage users to enter ship via and billing type in Epicor so shippers do not have to make any decisions.
New Pack:
Click on the “Dog Eared” piece of paper icon on the left of the Icon Bar.

OR
Click on the File | New | New Pack drop down menu.

We suggest working from the bottom up on this screen.
Enter 4 fields - What I’m shipping, In What, Weighing What and How.
Enter Order Number | Tab

1 - Select Mass Shipment
Select Ship All (F10) – Option to change quantity.
NOTE: CANNOT use mass shipment with lot tracked or serial parts.
2 - Enter or select Packaging Type.
If the search does not contain the Packaging Type you need; right click to get Entry/Search capabilities.
3 - Enter Weight OR F8/Actions | Get Pack Weight:
If Scales are setup in Epicor ERP; the weight will be pulled in with F8 or manually enter.
Scale default Setup in Epicor ERP : Shipping/Receiving | Setup | Workstation.
4 - Verify Ship Via Entry.
Ship via will default from Order Entry. Change if Necessary.
NOTE: Ship Via and Weight are the ONLY required entries. UPS and FedEx return a more accurate cost if Packaging Type is entered.
Actions | Close(F4)
“Putting Tape on the box” (Status Changes)
Actions | Freight(F5)
After Freighting – Status will be “Freighted”
Labels Print
Epicor ERP allows for BPM (Business Practices Modification) to Automatically print the PackSlip and mark the shipment 'Shipped' hen you Freight the package.
Change status to “shipped” (Enables invoicing)
2 Ways to 'Ship'
Ship Method 1:
“Optional if not using the Print Pull Down” Just check ‘Shipped’ Box.

Else
Ship Method 2:
Select Actions | Print from the pull down menu or use the printer icon to print the packing slip and optionally mark as 'Shipped'. After window is closed the following message appears.

Reverse Shipments:
To reverse the shipment and re open it:
Uncheck the ‘Shipped’ button, Select Unfreight, and Open. The order is now back to what it was before starting the shipping process.
First 5 tabs are considered ‘Pre-Freighting’ tabs. i.e. the information is only available to change BEFORE freighting occurs. They all refer to Freighting setups.
NOTE: The first 5 tabs are also in Customer Setup, ShipTo Setup and Order Entry billing tab.

Available Delivery / Pickup Options:
Saturday Delivery - Available
Saturday Pickup - NOT Available
Residential Delivery - this flag is used to identify a Residential Shipment. NOTE: FedEx Home Delivery is a SERVICE. If you receive:

Change your ShipVia to be FedEx Home Delivery.
Signature Required - Available
NOTE: This option is used in conjunction with the UPS Tab, Delivery Confirmation field. i.e You MUST enter a value in the UPS Delivery Confirmation field regardless of carrier in order for the signature portion to work.
Document Only - NOT Available
Handling:
Whatever is in the Handling Charge is ADDED to the freight coming back from whatever freight service you are using.
Insurance:
NOTE: Actions Close will populate the shipment value automatically. Epicor ERP will calculate the value of the shipment and populate the value field.
COD:
NOTE: Action Close will populate the shipment value automatically. If using FedEx Carrier, you must go to the FedEx tab and check the Ground Collection Type.
Add Freight to Amount - Includes the freight charge in the COD amount.
See International Class.
If you do not select anything on the billing tab, the default in Epicor will be to charge freight and add it to the customer invoice, “Prepaid and Add”.
Shipments with multiple Sales Orders; the PPA freight cost etc is written to the FIRST order of the shipment.
Using the Pull-Down Menu, you can select the Billing Type that you would like to use for this particular shipment.

The below in Red are the 4 Billing Types Epicor Manifest recommends.
Consignee – LTL ONLY. Not used for FedEx or UPS.
FedEx Collect – FedEx Ground shipments only – No account number or address is required. The Billing Method in Epicor Manifest shows a Collect (NOT for COD). If user enters an Account number in the Epicor ERP Billing tab, it will display in Epicor Manifest but is NOT transmitted to FedEx. FedEx will have the recipients FedEx account number on file.
NOTE: It is NOT recommended this be used unless the Shipper has been given SPECIFIC instructions to do so by the customer. If the customer does not have a valid contract with FedEx, the Shipper WILL BE billed for freight from FedEx.
This Billing code is specifically for a FedEx Contract for the customer. To charge a specific FedEx account number, use FedEx Recipient OR Third Party.
FedEx Prepaid – FedEx ONLY. (Default – same as if left blank) – charges sender for freight, freight charges added to customer invoice
FedEx Recipient – FedEx ONLY. For all air and ground FedEx parcel and FedEx FREIGHT Shipments. Requires 9 digit account number. Bills recipient for freight. No shipping charges added to customer invoice. Account number is not required if shipping LTL (truck).
Shipper – Free freight – prepaid, no add - charges sender for freight, does not post charges back to customer invoice.
Third Party – Bills freight charges to a third party account. For FedEx and UPS Account number required Address not required but suggested entering if available.
For LTL account number is “not” required; billing address information is mandatory. However Third Party address information will be blank in BOL entry in ISM.
UPS Consignee – For all air and ground UPS parcel Shipments. An account number is required. Bills consignee/recipient for freight. No shipping charges added to customer invoice.
NOTE: If the information is not correct, UPS bills shipper for freight. This billing method is ONLY supported in US or Puerto Rico.
UPS Cost And Freight – International - Not currently used in Epicor Manifest Application.
UPS Delivery Duty Paid – International - Not currently used in Epicor Manifest Application.
UPS Freight Collect (NOT COD)– For air or ground collect shipments, account # required (6 digits/characters). Bills recipient for freight. No shipping charges added to customer invoice. Account number is not required if shipping UPS LTL (truck).
NOTE: INTL Shipments require a specific test account number for testing. If you have not secured the International TEST account number you will receive an error.
UPS Free On Board – International - Not currently used in Epicor Manifest Application.
UPS Prepaid – (Default – same as blank) - charges sender for freight, freight charges added to customer invoice
UPS Shipping Duty And Tax – International - Not currently used in Epicor Manifest Application.
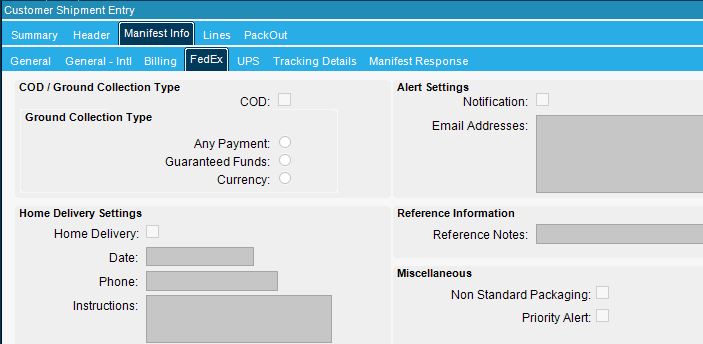
COD/Ground Collect Type:
For COD Shipments; you must first check the COD box in the General tab. It will automatically check this COD box and you will then need to check a Ground Collection Type.
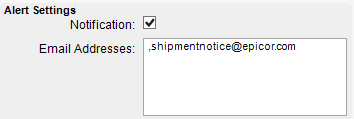
Alert Settings:
In the Epicor ERP Freighting process if the Pack ID has the Manifest Info | FedEx tab | Alert Settings | Notification | EMail Addresses selected, an email will be sent to the individuals indicated.
There is a maximum of 3 types of EMails that will be recognized by FedEx.
Emails are seperated by a comma (,).
The email entered in the first position(if entered) will receive a Delivery Notice.
The second email(if entered) will receive a Shipment Notice.
The third email (if entered) will receive any Exceptions of Delivery.
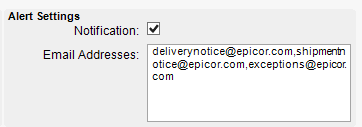
In the below example
deliverynotice@epicor.com receives the delivery notice.
shipmentnotice@epicor.com receives the shipment notification.
exceptions@epicor.com receives any exception notices.
In the below example
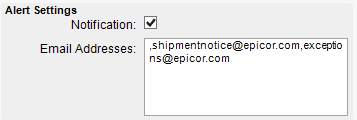
No one will receive the delivery notice.
NOTE the leading ",".
shipmentnotice@epicor.com receives the shipment notification.
exceptions@epicor.com receives any exception notices.
In the below example
No one will receive the delivery notice.
NOTE the leading ",".
ONLY shipmentnotice@epicor.com receives the shipment notification.
No one receives any exception notices.
Reference Information:
Reference Notes: The value in this field OVERRIDES the default from the Facility record.
Miscellaneous:
If checked it creates a tag in the FedEx xml request that will trigger FedEx to add their additional handling charge for large/odd-shaped packages.
Not necessary to check if creating dimensions because FedEx will auto calculate and assess the charge if package size meets dimensions threshold, but FedEx also charges for odd shapes which only the shipper would know because it is a visual and not a dimensional threshold, so if it is known FedEx will invoice for additional charge and you want the additional charge included in the new freight posted back to Epicor, check this box.
Priority Alert:
With FedEx Priority Alert, we'll assign your account to a global service analyst who provides around-the-clock support; advanced shipment monitoring; proactive, personalized notification in the event of a delay; and, when necessary, customized package recovery.
Not currently used in Epicor Manifest Application.
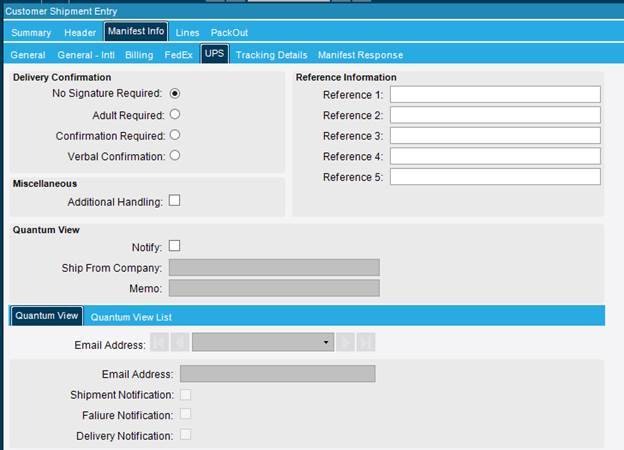
Delivery Confirmation:
No Signature Required - Default
Adult Required
Confirmation Required
Verbal Confirmation
NOTE: This option is used in conjunction with the General Tab | Delivery/PickUp | Signature Required Box. i.e You MUST check the Signature Required Box in the General Tab regardless of carrier on the shipment for the signature portion to work.
Reference Info:
1 – Optionally used by UPS and FedEx
2 – Optionally used by UPS and FedEx
3 - Optionally used by FedEx
4 – Optionally used by FedEx
5 – Not used in Epicor QuickShip
The values typed here override the Facilitates |Options tab.
Miscellaneous:
Additional Handling - Additional charge of 10.50 is added to the freight amount as of 09/15/16.
If checked it creates a tag in the UPS xml request that will trigger UPS to add their additional handling charge for large/odd-shaped packages.
Not necessary to check if creating dimensions because UPS will auto calculate and assess the charge if package size meets dimensions threshold, but UPS also charges for odd shapes which only the shipper would know because it is a visual and not a dimensional threshold, so if they know UPS will invoice for the additional charge and you want the additional charge included in the new freight posted back to Epicor, check this box.
Quantum View:
Enter the Ship From Company and any Message you wish to show on the e-mail from UPS. (Thanks for your order, etc)
To add e-mails use the file pull down to Add E-mails. Information will default from Customer|Manifest Tab ONLY. NOT from Customer|Contacts.
Up to 6 e-mails. 3 types of e-mails.
Adding UPS Email Addresses to Customer Accounts and/or Shipments:
1. Manifest Info Tab
2. UPS Tab
3. Select New Ship-To UPS Email
4. Enter the email address, click Shipment Notification and Save. You can add multiple email addresses by re-selecting “New Ship-To UPS Email” selection dropdown.

Shows detail of Phantom Packs. See Multiple Package Section for more info.

Shows information returned from the Carrier, etc after Freighting.

PubFreight:
This is the value printed on the invoice. It may or may not have a value due to the Freight Billing terms. i.e. if it is Shipper, Collect etc the customer invoice will not have a value i.e. zero. This field includes any Handling or Misc charges.
Discounted Freight:
This is the actual freight amount that the carrier is charging you. (Raw Freight)
Other Amt:
Not currently used in Epicor Manifest Application.
Dim Weight:
If the package size changes the weight the package will be billed at, the new weight is displayed here.
Waybill Number:
Not currently used in Epicor Manifest Application.
Freighted Ship Via Code:
This is the Epicor ERP Ship Code that was used to process the shipment.
After Freighting, the Details button will direct you to the Carriers Website if the carriers Tracking URL has been setup on the Epicor ERP Ship Via Code.
See Manifest HELP for example.

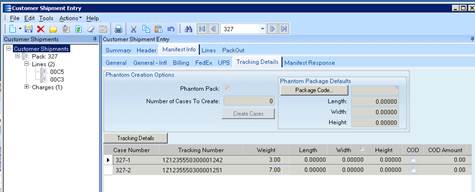
Epicor ERP defaults to creating only one case unless you add cases thru Phantom Pack.
Create New Pack
Enter Sales Order | Tab
Select Mass Shipment
Enter Ship Qty or Ship All
Depending if you need individual Case weights; enter weight. See below for individual case weights.
Close
Go to Manifest Info Tab / Tracking Details:
Click ‘Phantom Pack’ , enter # of packages, Click ‘Create Cases’.
SAVE!!!!!!!
Update Weight, Length, Width, Height, Declared Amount, etc. if necessary.
If you are utilizing a scale, do not weigh the packages in the Summary tab. Place your cursor on the first cases’ Weight field and place the box on the scale. Save the order. Repeat the process until all Cases are complete.
SAVE!!!!!!!
Freight the package.
NOTE: If you try to un-freight, it gives an error. You must uncheck and remove the phantom boxes.
NOTE: The Tracking # from the summary screen is for the first package only. Must go to the Tracking Details screen to see all packages.
NOTE: The weight you enter or change on the Detail screen re-calcs to the Summary Screen.
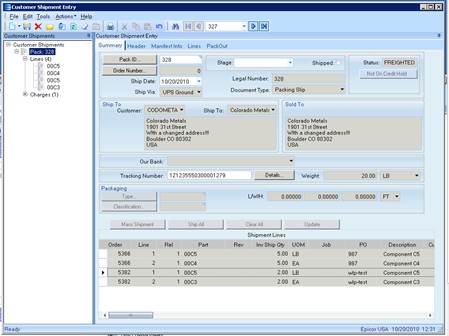
Create New Pack
Enter First Sales Order # | Tab
Mass Shipment
Enter Ship Qty or Ship All
SAVE
Enter (second,third, fourth, etc) Sales Order # | Tab
Mass Shipment
Enter Ship Qty or Ship All
SAVE After Each Order.
Close
Freight
Multiple orders puts the freight cost with the first order
Under Construction
See Miscellaneous Shipments with Products
See Miscellaneous Shipments without Product
(Point of NO RETURN)
At the end of day, you will want to close the carriers and may want print your Manifest Summary or Manifest Detail Report.
The Close Carriers function is used to complete shipments and manifest. The act of manifesting is the final step in finalizing shipments and rendering them ineligible for further modification or editing. This screen is the last point of opportunity to enforce data integrity.
When you process Close Carriers; the packages are not longer able to be ‘Unshipped’/'UnFreighted'. If you have done Epicor ERP invoicing but not Manifest Close Carriers you CANNOT ‘Unship’ the orders. The orders will be picked up on the next Manifest Close Carriers but once Invoicing has occurred you can no longer ‘Unship’ them.
Typically closing your shipments at the end of each day is assigned to one individual. It is usually completed in Manifest on a daily basis. You can Close Carriers multiple times during the day if you have multiple carries and/or multiple pickups.
The Close Carriers process triggers UPS and/or FedEx specific EMail notifications, as well as the Manifest Application EMails setup in the Manifest Customer file.
(See Advanced Class for Epicor Manifest Customer Email processing)
NOTE: Once you have 'Closed Carriers' you must do an RMA in Epicor ERP if you want to cancel the shipment and do a NEW sales order to ship out the new shipment.
Navigate to the Shipping / Processing / Close Carriers screen.

Check the Select box next to the carrier that you wish to close, and click “Close Carriers” at the bottom of the screen:

Post Only:
Not Used in Epicor Manifest Application.
After pressing the Closed Carriers icon, the carrier that you have selected, UPS in the above example, will then be removed from the Close Carriers screen and all of the shipments for the day will have a status of Manifested and be assigned a Manifest ID.

If you wish to view that Manifest ID and all of the shipments involved, navigate to the Shipping / Inquiry / Manifest Inquiry Screen.
Navigate to the Shipping / Inquiry / Manifest Inquiry screen.

Input your search criteria and click “Search”:
The Manifest IDs associate with the entered criteria will appear in the top grid. Highlight the Manifest ID you wish to review and select 'Get Shipments'. This will display each shipment in that Manifest. By double clicking on the specific shipment, a detail window will open displaying the details of that specific shipment.


If you wish to Print/Reprint the Manifest Reports, highlight the Manifest ID line in the top grid and go to the Reports menu at the top. Choose Manifest Reports and the reports will be reprinted:
NOTE: The Carrier Summary, Carrier Detail NOT used in Epicor Manifest Application.

Manifest Detail Report Example

Manifest Summary Report Example
