
Confirmation emails are generated by Epicor Manifest Application and are not a service provided by the carrier. While most the of the Confirmation Email information is setup in the Email Template screen, there are also six Application Settings that need to be setup.
| Group | Name | Facility | Description |
| EmailFromAddress | Leave Blank unless NOT for ALL. |
Sets the From email address of email notifications. | |
| EmailImageLocation | Leave Blank unless NOT for ALL. | Displays the location of the company logo to be used in the email template. | |
| EmailSubjectLine | Leave Blank unless NOT for ALL. | Sets the default subject line for email notifications. | |
| EmailWebLink | Leave Blank unless NOT for ALL. | Displays the location of the link to use for the company logo hyperlink in the email template. | |
| SendShipmentEmails | Leave Blank unless NOT for ALL. | If true, indicates that when a carrier/manifest is closed, the system should send confirmation emails to any customer that has an email address on file with a generated HTML email. | |
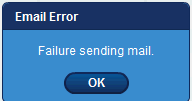
| EmailTestAddress | Leave Blank unless NOT for ALL. | When confirmation emails are sent, a test email will be sent to this address to confirm the email settings are properly implemented. If this email fails, the user will receive an error on the Close Carriers or Manifest Inquiry screen. If this setting is not used or blank, then no test email will be sent. |
The Email Template screen is used to customize the confirmation emails to meet the user’s needs. After the email templates are created, the user can assign the appropriate template to each facility in the Facilities screen.
On the Email Template screen, add a new record. This will add a record to the top grid. Enter the name and description requested by the user. Remember that these email template records can then be assigned to the facility to determine which template to use.
Next, add a Revision to that email template record. This is where you will include the html template and decide when this format will be published for use.
Include a Name and paste the html code into the HTML box. We will provide a default HTML that the user can edit if needed, or they can draft their own html email template.
The revision then needs to be approved and published. Click the “Publish” button and the following pop-up will appear:
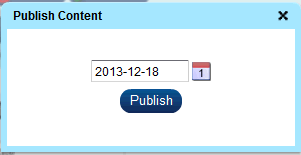
Choose a publish date and click “Publish”.
The revision will not be used in the emails until it contains a current Published date.
Remember:
- If this field is blank or the date is in the future and no other revisions exist with a current published date, confirmation emails will not be sent
- If there are multiple revisions, the one with the most recent current date will be used in the confirmation emails for that facility
In order for Confirmation Emails to be sent, the Email Application Setting for SendShipmentEmails must be set to True, and the Customer(s) and/or Customers.ShipTo(s) must have at least one Shipment Notification Email Address listed.
If these requirements are met, then when the Close Carriers function is completed for a Facility with an Email Template assigned, the Email Template Revision that has a current published date will be sent to the Customers with email addresses listed via the Mail Settings in the Web.config file.
Web.config File Mail Settings:
The Web.config File is located on the server where the Web Server is installed.
Usually C:\inetpub\wwwroot\InsiteShip V3.
Open the Web.config with Notepad.
Scroll down to the <MailSetting> segment. If not in the file add after ending </System.web> segment.
<system.net>
<MailSettings>
<!--smtp DeliveryMethod="SpecifiedPickupDirectory">
<SpecifiedPickupDirectory pickupDirectoryLocation="C:\temp\InsiteShipMail"/>
</smtp-->
<smtp from="tshipper@insiteship.com">
<network host="" password="" userName=""/>
</smtp>
</mailSettings>
</system.net>
SMTP DeliveryMethod:
This option identifies if you are sending the emails to a file folder. If commented out (!--) the emails will NOT be written to the directory specified in the pickup directory location. NOTE: Use this option only if not actually sending the emails.
SpecifiedPickupDirectory pickupDirectoryLocation:
If using the SpecifiedPickupDirectory option, this is the directory the email will be sent to.
SMTP From:
The email address that the emails will be sent from.
Network Host:
The companies email server.
Password:
Credentials for connecting to the company email server.
UserName:
Credentials for connecting to the company email server.
If the Email Application Setting EmailTestAddress is used or contains a value, then a test email will be sent to this address to confirm the mail settings are properly implemented. If this email fails, the user will receive an error/warning to check the mail settings in the web.config file. If this setting is not used or blank, then no test email will be sent. Confirmation emails will be sent and user will not be warned if mail settings are not properly setup.
To re-send Confirmation E-Mails, go to the Manifest Inquiry screen and search for the Manifest ID that you would like to re-send E-Mails on.
Highlight that ManifestID and go to the Resend menu at the top of the screen. Choose Confirmation E-Mails.
To re-send E-Mails on multiple Manifest ID’s, use Ctrl to select/highlight multiple Manifest records in the top grid. Choose Confirmation Emails from the Resend menu.
To re-send E-Mails on individual shipments, choose one or multiple Manifest ID's and click the “Get Shipments” button. The Shipments associated with those Manifest ID's will be listed in the bottom grid. Choose one or multiple shipments and choose Confirmation E-Mails from the Resend Menu. E-Mails will be sent for those shipments only.
ERRORS:
Standard EMail Template:
<h2 class="from">
From: {FromEmail}</h2>
<h1 class="subject">
Subject: {EmailSubject}</h1>
</div>
<div class="order-info">
<table border="0" cellspacing="0">
<tr>
<td class="order-conf-label">
<h4>
Shipment Confirmation</h4>
</td>
<td class="order-conf-number">
{OrderNumber}
</td>
</tr>
<tr>
<td class="order-date-label">
<h4>
Facility</h4>
</td>
<td class="order-date">
{Facility}
</td>
</tr>
<tr>
<td class="order-date-label">
<h4>
Ship Date</h4>
</td>
<td class="order-date">
{ShipDate}
</td>
</tr>
<tr>
<td class="order-date-label">
PO Number
</td>
<td class="order-date">
{PONumber}
</td>
</tr>
<tr>
<td class="order-date-label">
Shipment Weight
</td>
<td class="order-date">
{ShipmentWeight}
</td>
</tr>
<tr>
<td class="order-date-label">
Number Of Packages
</td>
<td class="order-date">
{NumberOfPackages}
</td>
</tr>
<tr>
<td class="order-date-label">
Container Number
</td>
<td class="order-date">
{ContainerNumber}
</td>
</tr>
<tr>
<td class="order-date-label">
Tracking Number
</td>
<td class="order-date">
{TrackingNumber}
</td>
</tr>
</table>
</div>
<div class="body-copy">
<table border="0" width="100%">
<tr>
<td>
<div class="billing-info">
<div class="bill-ship bill">
<table cellspacing="0">
<tr>
<th>
<h4>
Billing Address</h4>
</th>
</tr>
<tr>
<td>
{BillToAddress}
</td>
</tr>
</table>
</div>
<div class="bill-ship ship">
<table cellspacing="0">
<tr>
<th>
<h4>
Shipping Address</h4>
</th>
</tr>
<tr>
<td>
{ShipToAddress}
</td>
</tr>
<tr>
<td class="ship-via">
Order Shipping Via: {DeliveryMethod}
</td>
</tr>
</table>
</div>
</div>
</td>
</tr>
<tr>
<td>
<div class="items">
<table border="0" cellspacing="0" cellpadding="0" class="info-tbl">
<h4>
Order Items</h4>
<!--start orderline rows {CustomerOrderItems} -->
<table border="0" cellpadding="0" cellspacing="5" width="600" id='detail'>
<tr>
<td>
ProductID
</td>
<td>
CustomerProductID
</td>
<td>
Description
</td>
<td>
Qty Ordered
</td>
<td>
Qty Shipped
</td>
<td>
Qty BO
</td>
<td>
Unit Price
</td>
<td>
UOM
</td>
<td>
Cust Ref
</td>
<td>
Due Date
</td>
<td>
Order Line
</td>
</tr>
<tr>
<td>
{ProductID}
</td>
<td>
{CustomerProductID}
</td>
<td>
{ProductDescription}
</td>
<td>
{ProductQtyOrdered}
</td>
<td>
{ProductQtyShipped}
</td>
<td>
{ProductQtyBO}
</td>
<td>
{ProductUnitPrice}
</td>
<td>
{ProductUOM}
</td>
<td>
{ProductCustRef}
</td>
<td>
{ShipmentDueDate}
</td>
<td>
{OrderLine}
</td>
</tr>
</table>
</table>
</div>
</td>
</tr>
</table>
</div>
</div>
</body>
</html>