
Prerequisites:
Contact SpeeDee to obtain the following Shipper Account Information:
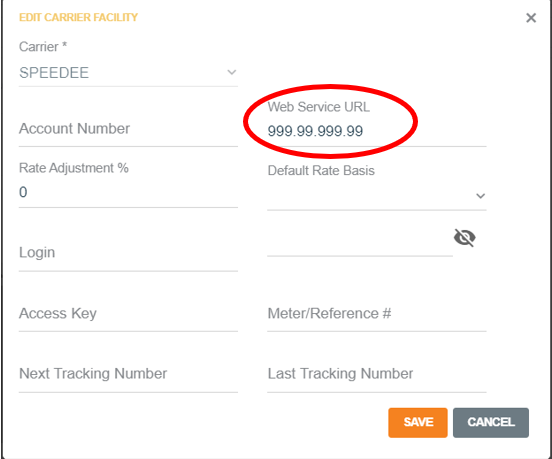
Web Service URL:
Customer specific IP address assigned to the shipper by SpeeDee. It is the IP address for th FTP site where your electronic EOD Manifest is uploaded to SpeeDee.
Account Number:
Customer specific account number assigned to shipper by SpeeDee. Enter as 6 digits [e.g. '3457' entered as '003457]
Password:
Assigned to shipper by SpeeDee.
IDAutomation Font:
You will need the C128XL Font from IDAutomation.
Rate and Zone Tables:
1. Go to the SpeeDee website (http://www.speedeedelivery.com/rates.html) to obtain zone and rate files. Rates/Zone Chart files are published by SpeeDee annually and go into effect January 1 of each year. Rate files are the same for all origin postal codes in the SpeeDee delivery service area.
Select the link to the Rate/Zone Charts under 'Download Rates' and download to a folder on the server. This may take a few minutes.
2. Once saved, unzip the file. The following 3 files will be used below for the installation process.
a. Sort Codes YYYY.csv - (YYYY is the year you are down loading information for)Identifies delivery routes. Sort Code files are published by SpeeDee annually and go into effect January 1. Sort Code file is the same regardless of origin postal codes in the SpeeDee delivery service area. This is typically in the Other Documentation folder.
b. YYYY Rates.csv (or current year rates). These records will store the per lb. Package rate for each SpeeDee zone based on origin postal code and will be used by the Rating Engine to calculate the per package freight. This is typically in the 2017 Rates folder.
c. SPYYY.csv - You will need to select the file with the beginning of the ship from zip code. This is typically in the Zones folder.
Data Packager Import:
1. Login to Epicor Quick Ship and navigate to the Reports/Tools | Data Packager Import.
2. Select the following packages:
MiscCodeGroups
Application Dictionary
ApplicationMessage
ApplicationSettingConfig
Carrier_SpeeDee
3.Click Process


4. After success of the import, close the Data Packager Import screen.
Carrier Setup:
1. Navigate to the Carriers screen where SPEEDEE is now listed as a carrier.
2. Highlight SPEEDEE in the grid.
3. On the General Tab, enter the IP address, obtained from SpeeDee, in the Web Service URL field. See the Prerequisites: Account Information section above.
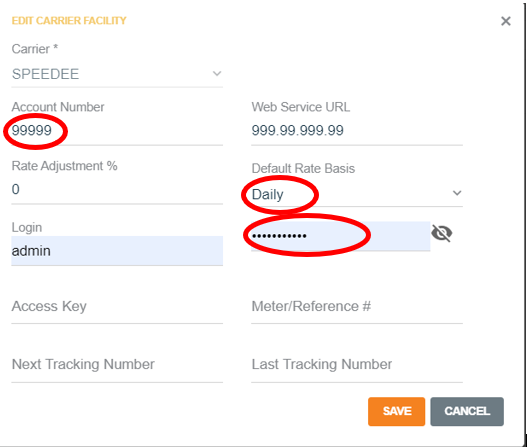
4. On the Facilities tab, add a new facility with the following information:
a. Facility: Select Facility
b. Account#: Enter the account number, obtained from SpeeDee, as 6 digits [e.g. '3457' entered as '003457]. See the Prerequisites:Account Information section above.
c. Default Rate Basis: Daily
d. Password: Enter the password assigned to shipper by SpeeDee
e. NOTE: There is NO Login entered.
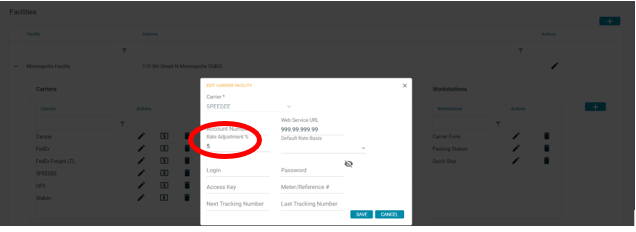
5. On the Facilities | Carrier Sub-Tab, setup the Fuel Surcharge by adding a rate adjustment % to the SPEEDEE service as follows:
The surcharge rates are published on the http://www.speedeedelivery.com/rates.html website under Fuel Surcharge.
The SpeeDee fuel surcharge adjustment must be maintained by the shipper as this charge is subject to change at the discretion of SpeeDee.
6. On the