NOTE: The screens depicted in these Help files reflect Quick Ship Version 5.3.0.XXXX. Earlier Versions may not have the same screens but field functionality remains the same.
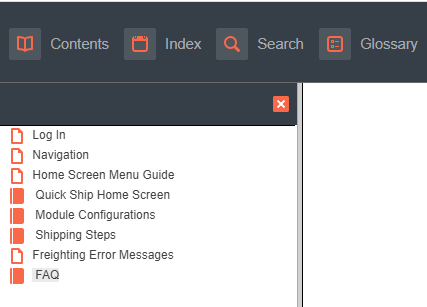
Home Screen Menu:
Left Side Bar Icons:
Home Screen Menu:
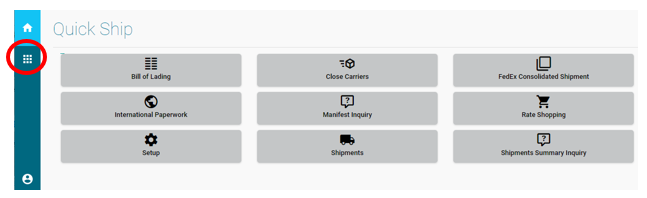
Upon successful login, the below Home Screen Menu is displayed.

Left Side Bar Icons:

Home:
This icon will return you to the Home Screen Menu from any screen.

Once logged into Quick Ship, you can review the information in the Browse Icon
 .
.
Note:
Admin defined users have access to Company, REST Settings, About, Help and Sign Out.
User defined users have access to Company, About, Help and Sign Out.
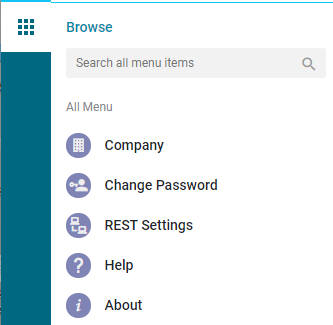
This option allows you to find the Browse Menu options.
Company
Change Password
REST Settings
Help
About
The Company screen is used to set up the user's company information. During installation, the Company and Registration ID were created to allow for data import and implementation. This screen is used for global parameters and should include the company's headquarters information.
This Company information is used for reference information. The actual UPS account numbers, etc are gotten from the Facilities record.
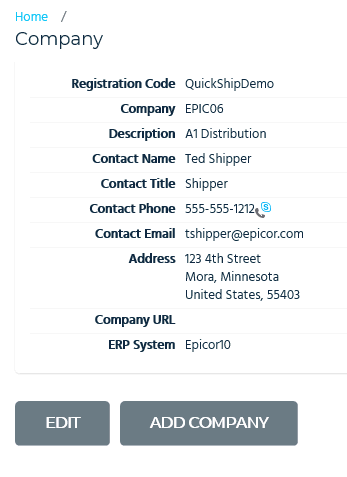
Registration Code:
This field is used to define the Registration Code for the company. The registration code is assigned to the company during installation and implementation and will be used for licensing as well as access to the application. This code is used to distinguish licensing information for licensing purposes and will be needed for users logging into Quick Ship. Typically It is the Site ID for E10 Accounts.
Company:
The Company name was added during installation and is required to create a company.
Description:
This field is used to define the extended description or name of the Company..
Contact Name:
This field is used to define the name of the contact person for the Company. Enter the high level contact person or company representative.
Contact Title:
This field is used to define the title of the contact person for the company.
Contact Phone:
This field is used to define the phone number of the contact person for the company.
Contact Email:
This field is used to define the e-mail of the contact person for the company.
Address:
This field holds the Corporate address information.
Note: This is NOT the address that is used as the return address on the tracking labels. The Facility Address is used for the shippers return address.
Company URL:
This field is for the Company URL.
Please Note:
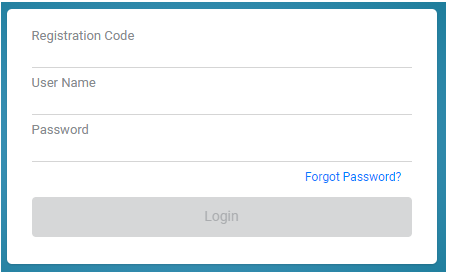
Your account will be locked after 3 unsuccessful attempts.
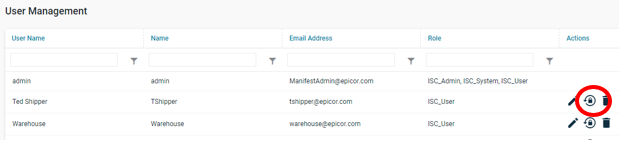
The Change Passwords screen is used to maintain the user login Password Setting. Only users with the assigned ISC_Admin role will have access to this screen. During installation an ISC_Admin user was created, but there can be more than one login with these rights.
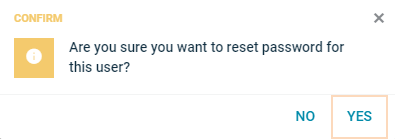
Select the Reset Password Icon. 
You will be asked:
Change Password Question & Answer:
Current Password:
Enter Current Password for user.
Password Question:
Select one of the Questions from below users will be required to answer to logon.
What was the street name you lived in as a child?
What were the last four digits of your childhood telephone number?
What primary school did you attend?
In what town or city was your first full time job?
In what town or city did you meet your spouse/partner?
What is the middle name of your oldest child?
What are the last five digits of your drivers license number?
What is your mothers maiden name?
What is your spouse or partners mother's name?
In what town or city did your mother and father meet?
What time of the day were you born? (hh:mm)
What time of the day was your first child born? (hh:mm)
Password Answer:
Enter the answer to the above selected question.
Representational State Transfer is an architecture style that defines a set of constraints to be used for creating/ designing Web services.
REST settings activate and configure the REST services to work with your E10 application.
This option is only available to Admin defined users.
These settings are typically setup during installation and should NOT be changed without the direction of a Quick Ship Consultant.
NOTE: Only users with admin right can access this module. Contact your administrator for more information on this module.
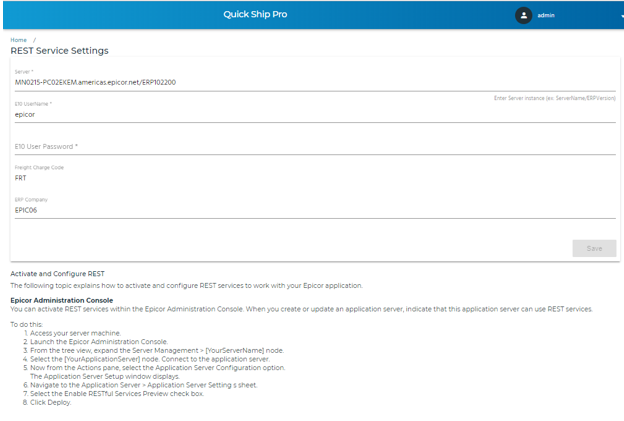
Server:
This information was entered when Quick Ship was installed. It is the SQL location and instance name that was entered.
E10 UserName:
This information was entered when Quick Ship was installed. It is the E10 Administrator that was entered.
E10 User Password:
This information was entered when Quick Ship was installed. It is the E10 Administrator that was entered.
Freight Charge Code:
This information was entered when Quick Ship was installed. It is the E10 Miscellaneous Charge Code for your Freight Charge .
ERP Company:
This information was entered when Quick Ship was installed. It is the E10 Company ID that was configured.
Epicor Administration Console:
You can activate REST services within the Epicor Administration Console. When you create or update an application server, indicate that this application server can use REST services.
This option opens a window that directs you to the Help files, a resource for Quick Ship setup and procedural information.
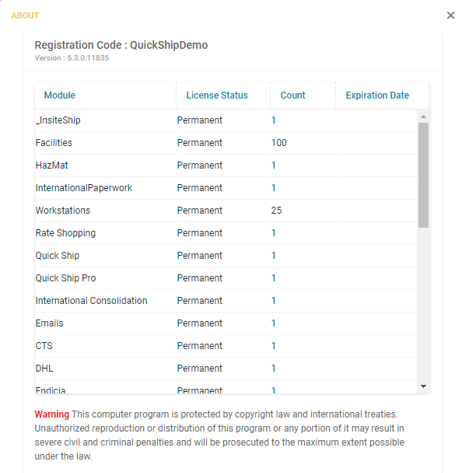
This option displays Licensed modules, the installed Version of Quick Ship, the number of Facilities, and the number of workstations.
Use this option to select/change your workstation and/or Log Out of Quick Ship.
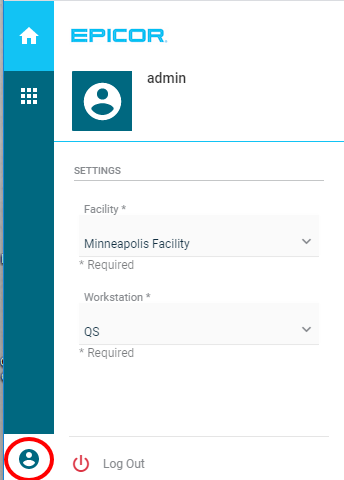
Current User Identified:
Settings:
Facility:
Current User is displayed, use the pull down to select/change the Facility this user is allowed to use.
Workstation:
Current Workstation is displayed, use the pull down to select/change the Workstation this user is allowed to use.
The Log Out Icon returns you to the Sign On Screen.
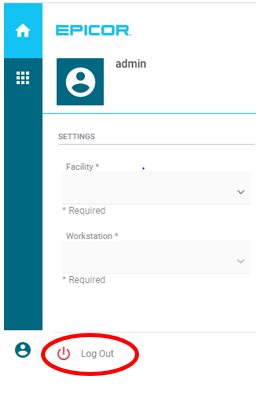
Using the Log Out Icon returns you to the Log In screen.
NOTE: you can also exit Quick Ship by Closing the Quick Ship window.